
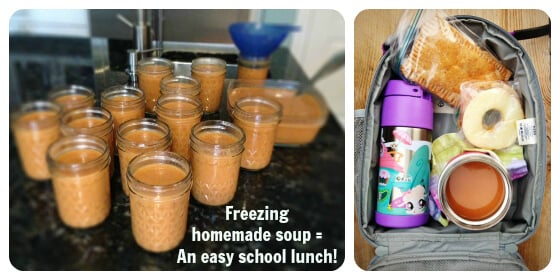
It's no secret that I like to send warm soup (or leftovers) to school with my girls in insulated Thermos food jars. I've actually made a habit of doing this on Wednesdays because I like to have one night per week when I don't have to be "creative" with packing school lunches.
I make big batches of their favorite soups in advance, freeze them in individual jelly jars (leaving room at the top for the soup to expand), and then "voila!" lunch is pretty much done one day a week for weeks to come.
Want to Save this Recipe?
Enter your email below & we'll send it straight to your inbox. Plus you'll get great new recipes from us every week!
Not All Thermos Jars are Created Equal
So you can imagine my surprise when one Wednesday I had lunch with my daughters at school and asked to take a bite of each of their soups. Some readers have told me their insulated containers keep their kids' food piping hot and others have said it's so cold their kids won't even eat it. So I decided to see for myself how warm the food actually was by lunchtime (about 5 hours after packing it in the morning).
Their lunch periods are only 20 minutes apart and the first daughter's soup was fairly warm - even warm enough for a cold-natured person like me that prefers things pretty hot (soup, mochas, showers...you name it). Then I sat with my other daughter less than a half hour later and realized her soup was MUCH colder (she still ate it anyway - good girl LOL)!
But, from the outside their food jars looked identical...same brand, same Hello Kitty logo, etc. and after packing them at the same time using the same method/soup I just knew something was not right.
So I of course turned to my engineer husband who conducted a very scientific, controlled test to make sure the dramatic difference in temperature wasn't just my imagination...and this is what he says about it:

"First I inspected the food jars and even though they looked the same on the outside I found there was actually a difference on the inside. For one, the vacuum seal (beneath the bottom cover) on the colder jar looked inferior, and two, the shape of the bottom of the container looked like it would facilitate more heat transfer, which is not what you want when you're trying to keep the heat in the container.
But to prove this theory I ran a simple test using one cup of boiling water (212 degrees) in each. Thermos brand food jars claim to keep food warm for five hours and after four hours the water in the 'bad' food jar (pictured on the left) was at 85 degrees, whereas the water in the 'good' jar (pictured on the right) was at 120 degrees...35 degrees is quite a difference!
I'm not sure if the vacuum seal was in fact broken or if this was just a knockoff/poor design, but regardless after calling the Thermos Company they sent me a new jar for free in exchange for me mailing them the 'bad' food jar at my own expense. Now we can be certain that both of our kids are consistently getting warm soup (or leftovers) at school!" - Jason Leake
Is "Pre-Heating" Food Jars with Boiling Water Worth It?
I've been told by dozens of readers that "heating up" Thermos jars with boiling water prior to adding the soup/food would keep it warmer longer. This theory does sound plausible so I started doing it myself hoping it would help!
But, being the skeptic my husband is, from day one he said he did not think the boiling water would make much of a difference for our application. He also didn't like having to go through this extra step in the morning when he helped me get the girls off to school. :)
So once again my husband's engineering background kicked in and he conducted another scientific test to determine if pre-heating the Thermoses made a difference or not:
"To test my hypothesis I got two identical food jars and labeled one as "pre-heated." I filled that jar with boiling water, let it sit for 7 minutes, and then dumped out the hot water. I then immediately filled both jars (one pre-heated and one not) with exactly one cup of boiling water and closed the lids tightly.
After 4 hours I removed the tops and measured the water temperatures with our kitchen thermometer. The pre-heated one was only half a degree warmer...not even enough to notice!
So I'd say the pre-heating is not worth the extra time, at least for this scenario. That being said, insulated container manufacturers do recommend it for optimal performance, so perhaps it is worthwhile if you live in a very cold environment." - Jason Leake
Our Advice
We think that good quality, insulated food jars and drink bottles can be incredibly useful when it comes to transporting and keeping your "real food" meals and beverages warm (or cold). In fact, at the pool one day I found myself drinking water out of my children's Thermos bottles because their water was still icy cold while the water in my non-insulated steel bottle had turned lukewarm. I now have an "adult" Thermos bottle that I love and seriously take almost everywhere (in the car, on the plane, etc.).
So we highly recommend them, but when it comes to selecting a food jar, if possible, try to avoid the "bad" style shown on the left in the picture above. Also when it comes to adding food to the jars remember you can skip the pre-heating (i.e. boiling water) step. Simply warm up your food, add it to the food jar, put on the lid, and you should be good to go for about 5 hours.
There's one other tip in regard to the lid though...I've found that I have to screw on the lid all the way and then slightly unscrew it (by maybe a quarter of a turn) to make it easier for my children to open it by themselves at school. After you loosen the lid, simply hold the jar sideways and make sure no food leaks out in order to test the seal.
Please share with us in the comments what your experience has been with using insulated food jars!


Leave a Reply