Want to Save this Recipe?
Enter your email below & we'll send it straight to your inbox. Plus you'll get great new recipes from us every week!
I hope this will be my first of several posts about how to “can” and preserve fresh foods when they are in season. I am a beginner canner myself, but have always been intrigued by and interested in the whole process. Below you'll also find a sugar-free strawberry jam recipe that you can make with just a handful of tools. (You don’t even need to use a canner!)
How to Can Jam Without a Canner: Sugar-Free Jam Recipe
So I recently took a “Canning Class” (led by Ashley Eller at Poplar Ridge Farm) and have also been reading through some other resources, including the Ball Blue Book Guide to Preserving. Prior to my class, I knew absolutely nothing about canning except that I thought it sounded confusing, complicated, and like something that would take an entire day to do (not true!). The recipe I'm sharing today is without pectin, (refined) sugar, or artificial sweeteners.
Featured Comment
I LOVE this jam. It’s really tasty, and the fact that it’s all natural is even better. I’ve never made jam before, so this made it super easy.
From one beginner to another, a few key points on how to can jams:
- In simple terms, canning food is cooking recipes (which most of us already know how to do) and then “processing” the results by putting them in sterilized canning jars and boiling or pressure “cooking” them for a designated amount of time. It really isn’t as complicated as I originally thought. :)
- It is important to use canning recipes from reliable sources. Especially as a beginner these are not recipes you want to modify or adapt in any way because each ingredient as well as both the length of time and temperature at which the jars are processed can be key components to ensuring food safety.
- You must use jars that are in fact suitable for “canning” with two-piece metal lids, which does not include old washed out Ragu spaghetti sauce jars. The most widely used brands of jars for canning are Ball and Kerr, and while the jars and bands (that go around the lid) are reusable you must always use brand new lids to properly can foods. Now I know why I see those packs of lids for sale.
- It is necessary to sterilize the jars and lids before pouring in your jam (or other recipe). You can do this in hot water (180 degrees F), or if you can time things right run the jars and lids/bands through the dishwasher so they are hot and ready right when your recipes are done.
- According to the Ball Blue Book Guide to Canning to process high-acid foods like berries and tomatoes you simply boil them (in the jars), but you actually need to pressure can low-acid foods like asparagus, peas, and corn. So my personal plan is just to stick to the high-acid produce for a while until I really get the hang of things.
- If you aren’t sure if your foods “canned” properly your nose and/or a quick taste test should confirm whether a jar spoiled or not when you open it.
- You certainly can spend your entire day preparing big batches of recipes in order to preserve in-season produce when it’s fresh, but it does not have to be a huge production. In fact, I made a small batch (half the recipe) of the strawberry jam posted below in just over an hour…and I am a newbie. (More of a blueberry jam fan? Find a honey-sweetened recipe here!)
- Please share your canning tips in the comments below…I know some of you have been doing this for many years!
Some helpful tools to make the canning process easier:

The “need to have” canning tools...
- Jars (of course!) – I personally like the versions without shoulders so they are freezer-safe as well. (Hint: if you use the jars for freezing instead of canning be sure to leave room at the top for the liquid to expand.)
- Ball Utensil Set – This set includes a jar funnel, jar lifter, lid lifter, and bubble remover/headspace tool. I found the first three of these items to be invaluable, although I could probably live without the bubble remover/headspace tool (for now).
- A large pot – You’ll need one big enough to hold several sealed jars that could be covered with 1 – 2 inches of water. This does not have to be a “canning” pot (sometimes called a water bath canner)…any big old stockpot will do.
- A ladle – This is necessary to get your jam (or whatever you are making) from the pot to the jar.
- A digital or analog scale – Some recipes call for ingredients in weight measurements, but not all. I have an extremely basic analog scale and to be honest it totally does the trick.
- Potato masher – This was a necessary tool in order to turn my cooked strawberries into yummy, mushy jam.
The “nice to have” tools...
- Basic thermometer – To test the temperature of the water before sterilizing jars/lids.
- Canning rack – This is to lower the jars into and out of the boiling water when you are processing them and to provide space between the bottom of the jars and the pot (you can use other things like jar bands, silverware or even a dish towel to create that space). I don’t personally have one and I survived, but I can see the value if you are going to be doing a lot of canning. Just make sure the size you buy fits your pot if you aren’t getting a set!
- Dissolvable labels – I seriously love these things, but if you can’t justify the expense some regular old masking tape will definitely get the job done.
- Pressure canner – As I mentioned above I don’t see myself “pressure canning” anytime soon, but if you want to preserve low-acid veggies then this is a necessary piece of equipment.
- Immersion blender - you could use this as an alternative to the potato masher, to blend up the ingredients
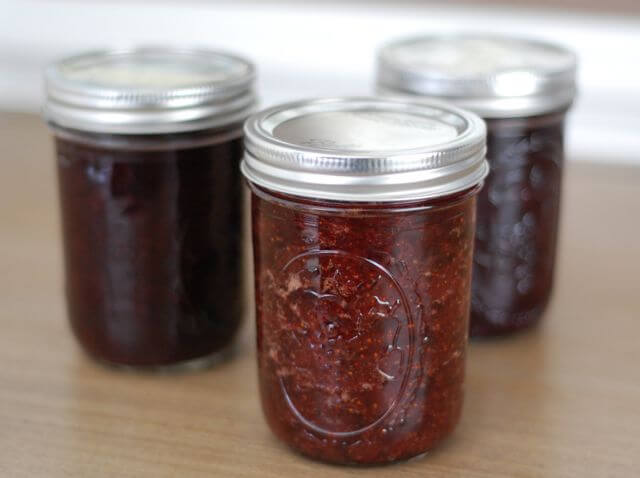
6 Easy Steps to Can Strawberry Jam Recipe Without Sugar and Pectin
- Follow homemade jam recipe (as stated below).
- While it’s cooking sterilize the jars and lids/bands in hot water.
- Ladle the completed jam into hot, freshly sterilized jars one-by-one.
- Add jar lid to the top while keeping the inside sterilized.
- Screw on the bands and add jars to boiling water for 10 minutes.
- Remove jars and listen for the “pop” sound to ensure jar lids have been properly sealed. It’s that simple! :)

Strawberry Honey Jam
Ingredients
- 6 pounds strawberries (or blueberries or other ripe fruit)
- 3 ¾ cup honey
- 1 ½ apples (unpeeled and grated)
- 1 ½ tablespoons lemon juice (freshly squeezed)
Instructions
- Make JamRinse the berries and remove any spoiled or severely blemished ones. Hull strawberries and slice in half.
- Add the berries, honey, grated apple, and lemon juice to a large pot over high heat. Once the mixture comes to a rolling boil, lower to medium heat and allow the mixture to continue to boil lightly for approximately 30 - 60 minutes. The berries will burst and thicken so be sure to scrape the sides of the pot and stir as you go. The longer the jam cooks the thicker the final product will be, although this recipe does not become quite as thick as typical store-bought jam (see note below about adding arrowroot powder or chia seeds for thickening)

- Mash the fruit with a potato masher once the fruit begins to soften. If foam forms on top of the fruit you can skim with a metal spoon and discard if desired.
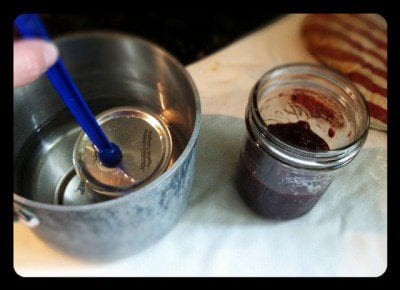
- Prepare Sterile Jars: Meanwhile fill the canning pot ¾ full with water, cover, and bring to a boil over high heat. If you don't have your jars sterilizing in a hot dishwasher you can use this pot of water to sterilize them. Also start a small pot of boiling water to sterilize the lids separately. Be sure to wash all jar pieces in hot soapy water first.
- Once the water is boiling turn off the heat. Test the temperature with your thermometer and when it reaches 180 degrees F put the jars and bands in the large pot and the lids in the small pot. Leave everything in the hot water until ready for use, removing one at a time as needed.
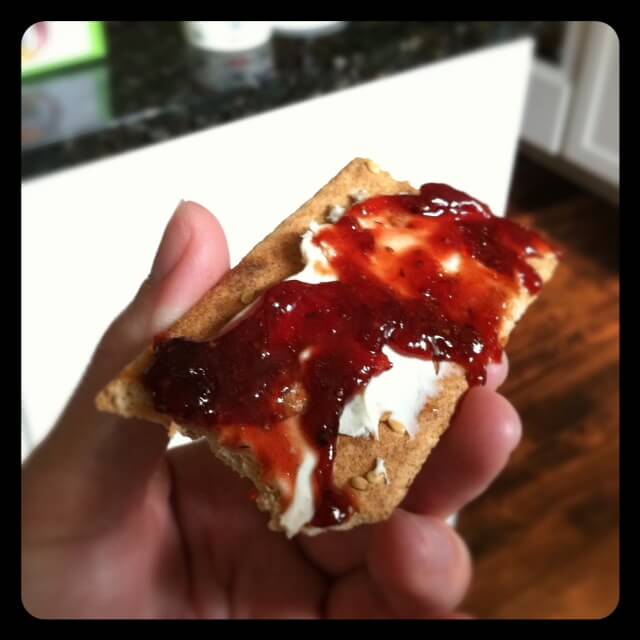
- When the jam is done cooking do a taste test to make sure the thickness and flavor is to your liking. Hint from Ashley: Drop dots of jam on a cold plate, if it seems to set up, it is done. You can also see if it coats the back of a spoon.
- Remove the first jar from the hot water using your jar lifter tool and shake out excess water. Don't touch inside of the jar in order to keep it sterilized. Insert clean canning funnel and ladle the hot jam into the hot jar leaving ¼ inch headspace at the top (this is where the headspace tool can come in handy - leaving more space at the top might not give as good of a seal). If there are any air bubbles you can slide a clean knife along the inside of the jar to remove them. Using a clean rag wipe excess off the outside of the jar and rim.

- Using a magnetic lid lifter pull the first lid out of the hot water and set on top of the jar without touching the bottom of it. Then while only touching the outside of the band screw it onto the jar just firmly enough so it doesn't feel wobbly on the grooves. Repeat until all jars are filled.

- Note (If you don’t want to actually “can” the jam): You could stop here and refrigerate jam for 3 – 4 weeks. To freeze the jam make sure you used freezer-safe jars, (Ball makes plastic jars for this purpose), leave at least a half an inch of space for expansion, allow the jam to completely cool, and put in freezer for up to one year. One additional tip for freezer jam is by placing a round of parchment paper on top of the jam, you can prevent ice crystals from forming.
- Process the Jars:Bring large pot of water back to a boil. Using your jar lifter (or canning rack) carefully lower as many jars that will fit without overcrowding into the boiling water so they are covered by at least 1 - 2 inches of water. It is recommended that the jars do not directly touch the bottom of the pot (so hot water can flow beneath them) and some even suggest putting a dish towel on the bottom to create space. From the moment the water is boiling and the entire first batch of jars are submerged set the timer and process them for 10 minutes.

- When 10 minutes is over use the jar lifter to carefully remove the jars from the water. Put them on the counter and don't move them right away. You will hear your jar lids "popping" which means they have been sealed properly. If jars aren't sealed within 12 hours then move them to the fridge and eat within 3 - 4 weeks.
- Remove bands from sealed jars and with a clean, wet cloth wipe off any jam that has congealed on the outside rim of the jar. This prevents mold from forming on the band. The band can be reapplied, but don’t screw them on too tightly.
- Label jar and store in a cool, dry, dark place for up to 1 year.


Notes
- You can optionally add in arrowroot powder or chia seeds as a way to thicken the jam. If you like jams with crunch, opt for the chia seed addition!
- We recommend organic ingredients when feasible.


Lisa Andrews says
How much arrowroot would you add to thicken 8 lbs. of strawberries.
syndi says
Get yourself a 4 cup glass measuring cup with a pouring spout. Ladle your hot jam into that and then pour it into the jars. It’s much easier and far less messy.
Betsy Peets says
I wish you used how many pints or cups of crushed fruit. 6 pounds is hard to measure
100 Days Admin says
It's about 5 quarts. - Nicole
Alison Newall says
I’m going to try this recipe thank you! A note: if somebody isn’t sure if something is spoiled, they shouldn’t taste it, although this shouldn’t be an issue with jam. It could be a major problem with tomatoes. If you’re not sure, don’t eat it. Good clues to spoiled preserves: bulging lid, improper seal (the lid comes off with little effort), a change in colour or smell. Some foods do change colour over time, though, like garlic. Tomatoes should smell nearly as tantalizing as when you picked them.
Nicolle says
I didn't can mine, but I did freeze some of them (and left one for the fridge). I just left a good amount of space in the top for expansion. I LOVE this jam. It's really tasty, and the fact that it's all natural is even better. I've never mad jam before, so this made it super easy. I used my emulsifier to blend it all up since my masher just left huge chunks and I prefer it with less. If you've never made jam before, this recipe is perfect. :D
Eric@Prolong the Harvest says
I know you said you can put the rings back on loosley, but I have seen other people recommend leaving the rings off completely after your jars have sealed. This keeps a jar from revealing itself after the seal has been broken due to heat or other circumstances.
Great post. Very in depth
Krystal L says
Wow this is delicious. It is very sweet in a good way. Personally I'd cut the honey back by about half. But I boiled it for 50 minutes and it came out nice and thick and was extremely flavorful. We will be making it again!
Elizabeth says
You didn't say how much arrowroot powder to use if you want to have thicker jam.
Krista says
Hi I love the recipe I'll gladly try it. But the optional part adding the arrow root or chia seeds to thicken is that safe to use if your actually canning to preserve the jam for later in the year?
bobby platt says
need a sugar free receipe for apricot preserves. apricots are fresh from the tree
Julie Banister says
If your berries are really sweet can you use less honey?
Kim says
Please note, that if you add the chia or arrowroot powder, this can only be safely kept in the fridge or frozen. Also, jam, being acidic will not develop botulism but if not correctly processed and sealed, may mold which s very unhealthy
Sari says
Thank you for this recipe! I am actually adding a bit of organic rosewater to make strawberry rose jam, but I've been hunting a way to get pectin and refined sugar out of it.
Cindy Tomlinson says
What happens if you consume stawberry jelly that was improperly sealed, & expired?
Amy Taylor (comment moderator) says
This is important info to have: https://food52.com/blog/15869-the-need-to-know-guide-to-botulism-for-safe-canning-preserving,
Kathy H. says
Can this be made with frozen (thawed) strawberries?
Amy Taylor (comment moderator) says
You can.