A few readers have shared a homemade “goldfish” crackers recipe with me. I decided to try the recipe (with several modifications), and while the outcome tasted good, the process of rolling out the dough took some time and made a huge mess.

Want to Save this Recipe?
Enter your email below & we'll send it straight to your inbox. Plus you'll get great new recipes from us every week!
As a busy mom I am a big fan of shortcuts, so the goldfish recipe inspired me to come up with these easy cheesy crackers. Making your own “crackers” from scratch sounds like such a daunting task, but trust me…this recipe is ridiculously easy!

Of course if you make this “easy” version you end up with round crackers as opposed to fun little shapes, but the last time I checked my daughters didn’t discriminate against a circle. They were too busy gobbling up these crackers and asking for more to even think about what shape they were eating.
And these are by no means just for kids. There are so many ways to get creative, which would surely impress any adult as well. Before baking experiment with adding some of these spices to the dough:
- black and red pepper
- fresh or dried rosemary
- diced olives
- diced jalapeños.
Or instead of mixing in herbs and spices, just top off the baked cheese crackers with something fun like pesto and grape tomatoes (just like we did for our dinner club last year). No matter what you end up doing, have fun with it and enjoy!
Easy Cheesy Crackers
Ingredients
- 1 cup whole-wheat flour
- 5 tablespoons butter (cold (cut into tablespoon size chunks))
- 1 ½ cups cheddar cheese (grated (the sharper the cheese, the cheesier the crackers))
Instructions
- Preheat oven to 350 degrees F.
- Combine all three ingredients in a food processor and blend. The mixture will eventually turn into one big ball chasing itself around the bowl. Be patient because it can take a few minutes.
- Roll the ball into a log about 1 ½” in diameter. At this point you could refrigerate the dough until later.
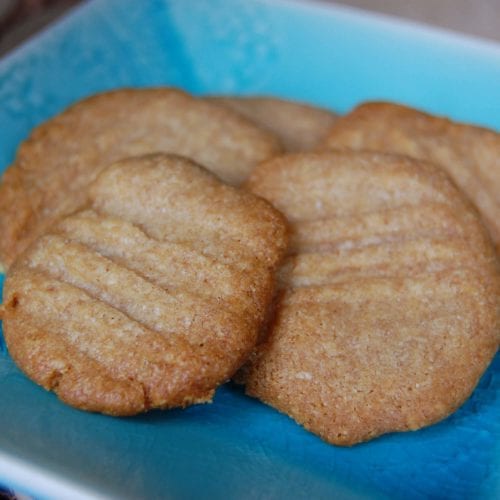
- With a sharp knife slice ¼” thick pieces off the log (pictured above) and place each one flat on an ungreased baking sheet. Try to rotate which side you are cutting down on because the top of the log does start to flatten a little. It is like your very own homemade slice and bake!
- If you want your crackers to look a little fancy (as pictured above) take a fork and gently mash down the top of each one before baking.
- Bake for 8 - 14 minutes or until golden brown. The thicker the crackers the longer it will take.
These crackers can be stored in the freezer so double the recipe and save some for later!
Notes
Nutrition Facts
Entered on Food Renegade's Fight Back Friday


Val says
Wondering if you could use a cookie press to make uniform crackers - is the dough too stiff?
100 Days of Real Food says
That would probably work...let us know!
Peace Lovin' Momma says
I made the dough in my vitamix blender and salted them before baking. you need the vitamix accessory that goes through the top of the lid and pushes/moves stuff around in the blender without getting caught in the blades. sorry, cant remember the name of the attachment. I half way rolled/pressed it into a thin 1/4 inch 'pancake' on the cutting board and used fun cookie cutter shapes! I had to use a knife to pick them off the cutting board. worked beautifully!
Courtney says
It's funny that I'm reading this recipe almost a year to the day you posted it! I clicked on it because it's one of your top posts, and I wanted to compare it to my recipe to see if mine could be improved. I use my own sprouted flour, and one thing that I think makes it super yummy is that I use a sourdough starter to add some liquid to it. I roll and chill them and slice as well. They last a while in the fridge so I can just take a log out and cook 'em up as we need. So fun to make my own crackers since nothing in the store is acceptable.
Brandy says
THANK YOU! We tried this today and they are a huge hit!
Since reading the comments have helped me tremendously, I share what I did to make them a success. :) I used a kitchen aid mixer with dough hook and like others, after 10 minutes, the dough never formed... I added 1 tsp of olive oil and 1 TBSP of milk. That did the trick. The dough formed up in a few minutes after that.
I rolled it out on clean counter tops... no flour or anything needed. We discovered the thinner, the better. My girls are picking through the pile to find the thin ones. :) I could actually see the pattern in my granite counter tops when rolling out thin... I cut them with mini star cookie cutters. Doubling the recipe, I got about 130. I lost count. :) Doing it this way DID make it a lot of work. But my girls love them! So long Cheez-its! *gasp!*
Kat says
Lisa, I LOVE these crackers SO much. I add about 1/2 tsp of chili powder and 1/2 tsp of garlic powder in to give it a little kick of flavor. The last time I made them I also let the dough harden in the fridge overnight and then sliced them as thin as I could on my mandoline, which resulted in super duper crunchy crackers... I wish I could make boxes of these at once!
Lindsey says
I made a HUGE batch of these last Saturday...and I'm now a fan! I am currently sitting at my desk eating a handful now :)
I had to add a touch of milk to get my dough to form, but I was using a kitchenaid mixer and not a food processor...so that could have been my issue. I made so many, I had to cook in seperate batches...I've come to the conclusion that the ones that are thin and cooked the longest are by far my fav!
Next batch I'm going to add a few things...maybe some garlic or spiced salts.
Nancy says
Gonna try these! Did the tortillas last night! Yummmm. Any suggestions on getting them nice and round? Ha. Mine were slightly imperfect! Still tasty, though. Also, used the crock pot chicken spices on a roast in a crock pot!! FABULOUS! Thank you. Working on my 10 day pledge. Officially starts today. Actually started last Sunday!
Nicole Mahler says
I have tried to make these twice and they were to crumbly each time. I found that if I added a little more butter they were more doughy. Anyone else had this problem? I haven't read all the comments so sorry if I am repeating!
100 Days of Real Food says
Did you follow all the directions exactly? You can squeeze together with your hands (into a ball) or add milk to help it come together.
Michelle says
I just made these and they are delicious. I used a wire cheese slicer to cut them and that seemed to work perfectly. Thanks for all your great recipes !!!
Charlene says
I was wondering - how long will these keep on the counter? In the fridge? In the freezer? I'm hoping to bring them on a trip and I won't have access to a refrigerator. Thanks for the help!
100 Days of Real Food says
They should stay fresh for about a week at room temp...and you could keep them in the freezer for a couple months.
Sarah says
Two for two with recipes from this site! I made these crackers today and they are delicious! My girlfriend loves them, which is very important, of course. I used sharp cheddar and smoked gouda cheeses with a sprinkle of garlic powder. Yum!!
Lydia says
Could one use a bread machine and the dough cycle instead of a food processer? I don't have a food processor....
100 Days of Real Food says
I don't think that would work...good idea, but I don't think it would mix fast enough.
Marion says
How about using vegan cheese or something else with nutritional yeast? Not big on dairy. Any thoughts?
100 Days of Real Food says
I've never used vegan cheese so I am not sure how that would work. Sorry!
MIchelindr says
I think you could also use an egg slicer to cut several at a time. I use mine for strawberries, mushrooms and polenta, so I think it would work great! I'll try it out and let you know.
Sara says
Ahh! My dough is practically cooking in the my Cuisinart...!? The dough is getting HOT (it just won't turn into a "ball"). I've added a bit more flour (the dough seems pretty wet)...any ideas on what is going wrong?
100 Days of Real Food says
Oh no! Did it work out (I realize I am getting this late)?
Amanda Lee Shields says
You don't happen to have the nutrition info on these do you? I can't wait to try them! I was just wondering what a serving size would be! :)
100 Days of Real Food says
(Per our discussion on facebook)...we don't keep track of any of that kind of stuff...we think that if we eat a variety of whole foods (in moderation - with plenty of veggies) that the rest falls into place!
Roxy says
I am Gluten free, so can I substitute any GF flour for the wheat flour?
Thanks!
100 Days of Real Food says
I haven't tried any substitutes myself so it would be an experiment!
Liz says
Can you use spelted flour for this?
Courtney says
Thank you so much for this recipe! I constantly love going back through your site to see what ideas & recipes I have overlooked. One of the only package products in our house that my husband will not give up are goldfish (whole grain/baked...doesn't matter though) or the cheddar bunnies. I always try to express that he could just have some fresh cheese over a triscuit--apparently not the same...Can't wait to try this. I love your blog & you are a great inspiring mom!
Lisa says
Thanks for posting the comment about the 3 - 4T of water! Mine just wasn't coming together, even after 20 minutes mixing! I don't know if it just didn't have a high enough fat content using low fat cheese or what...came together in less than a minute after that. Yay!
Jeana says
Why can't I find the Graham Cracker recipe you all speak of???
Rachel says
It's on the 1st page of comments for this post!!
Amanda says
These are SO good. Rolled them out thin between aluminum foil and then cut them out with star cookie cutters. Yummy!!!!
Lindsay says
Ok so I made these a second time today. The first time was good, but no one else really liked them. I had to add 3-4 T. of water or mine would have never came together. I also added 1 t. of salt. I then formed a log and wrapped in parchment paper and let it sit about an hour in the freezer. I lined a cookie sheet with parchment paper and cut them really thin. That was everyone's complaint last time, they were too cookie like rather than like a cracker. I baked about 15-16 minutes and they were AMAZING! All 3 kids and hubby couldn't get enough! And by slicing them so thin I got probably 50 crackers. YUM!
Jessica says
I can't wait to try out all the variations here. I just made the graham crackers and now I'm making the cheese crackers with extra sharp cheddar, a little parmesan and white whole wheat flour. I found that the pizza cutter was perfect for quickly cutting out the graham crackers, so I'm going to try that for cutting the crackers into little squares.
Sukyee Eng says
I am planning on making a big batch of these for my son and daughter as snacks for school and home.
Do these have to be refrigerated after they are baked?
Will they get soft and soggy?
If I freeze them after they are baked, do they stay crispy?
Sorry for all these questions but I'm a novice when it comes to baking.
100 Days of Real Food says
They do not have to be refrigerated. The thinner the crackers are the crispier they will be. The consistency will not change after they are defrosted. I hope that helps!
Emily Woodall says
do you 're-bake' them at all after taking them out of the freezer? Or just take them out, let them thaw and eat them? I am liking the idea of putting some in the freezer because it will keep us from snacking on all of them 'till they are gone. My hubby would eat them all in one sitting if he wasn't paying attention!
100 Days of Real Food says
I don't rebake them, but I suppose you could toast them a little if you want!
Stacie says
I wonder if you could mix this in a kitchenaid stand mixer? I do not have a food processor. Although I am starting to think I should invest in one.
100 Days of Real Food says
You could try it! Use the dough hook.
Jeana says
You can! I just did it. I was getting on here to see if anybody else had done it because I didn't think it was working and walked back to see a big clump of dough. I use the paddle thing. Not sure what it's called. It took probably 5 min. or more to finally clump together so be patient. :)
Candis says
I just tried these as a finger food for my 9 month old. They are so yummy, I don't know if he'll get many of them or not! I sprinkled in just a little Parmesan for extra flavor. I didn't believe the dough would really come together in the food processor, but it finally did. When I rolled them, instead of trying to make a log, I made a rectangular prism, so the crackers turned out a rounded rectangle shape, much easier than trying to keep them circular. A serrated steak knife worked well for slicing. Thanks for the great idea!
Kim says
I made the recipe just as you did, adding only some herbs de provence and and dash of cayenne pepper. I chilled the dough overnight to make it easier to slice. I gave these as gifts with bottles of wine for Christmas. HUGE hit! Thanks so much for the recipe!!
Whitney says
I was planning to try these crackers this weekend and I think I'll just sub whole wheat flour for the white flour. These seem pretty similar to yours -- and I wasn't planning to cut mine into cute shapes. Way too much trouble. ;)
http://tastykitchen.com/recipes/desserts/homemade-goldfish-crackers/
Erin says
Just pinned this to Pintrest! More mom's need to know about these crackers!!!! =) thank you so much for your blog!
Chelsea says
This may seem like a dumb question, but when you freeze these, do you bake them first or just freeze the dough?
100 Days of Real Food says
You could probably do it either way, but I personally bake them first.
l.c. says
I just made a batch and they turned out wonderfully! I used one readers technique of cutting them with dental floss to cut them much thinner than I could with a knife. I ended up with 4 dozen from one recipe. I also pressed half with the fork like you did and I pricked holes with the fork on the other half. These were so easy and quick to make. I know I will be making these often. I may try some other cheeses mixed together as well, maybe a little fresh grated Parmesan along with the sharp cheddar. I can see endless possibilities!
Sarah says
Just made the graham grackers. They are amazing! May do a very light sugar/cinnamon mixture on top next time. I recommend Sil-Pat mats for baking. No "greased" cookie sheet needed!
Jenny says
I know it's not as healthy but can you make these with regular white flour?
100 Days of Real Food says
I suppose it would work, but read this post first: https://www.100daysofrealfood.com/2011/07/22/understanding-grains/
Lisa says
Just a suggestion about cutting the log. Instead of using a knife, use dental floss (waxed but not minted). This website shows pictures to cut cinnamon buns, can't see how cutting the crackers would be any different :) http://theteachercooks.com/2009/10/02/cinnamon-rolls/ Quick and easy! :) Can't wait to try the recipe. I just made the homemade "goldfish" one yesterday and it was time consuming (all that rolling and cutting!) this looks way better!
Rosanne Bowman says
My husband recently found out he has heart problems. I was starting to switch us over to all real foods but now he is on board as well. I am excited to find this recipe because he LOVES CheezeIts but because of his really high triglycerides, really can't have processed foods anymore. Thanks!! I can't wait to try this recipe. I don't have a food processor (it's on my wish list though) - can I use a hand mixer or will that not work? Thanks!
100 Days of Real Food says
I have heard of people making it by hand so that works or a hand mixer with a dough blade might work too. Good luck!
Be says
Oh my goodness! I can't explain just how excited I am about this recipe! We recently made the switch to clean eating but it's been extremely difficult to find snacks that my 19 month old son will eat. He is a cracker lover and I have been scouring the internet for easy and clean recipes. I found the goldfish one but it seemed a bit too complicated and not freezable. I can't wait to try this!
P.S. Is it best to store these in the fridge or out?
Britty says
Okay, I made some last night and they were...okay. I could have made them better with a sharper cheese, I just didn't have any on me. But today, they aren't crispy anymore and not very "crackery." They aren't very good now that they've lost that initial crisp and gone a little soggy. Any suggestions?
100 Days of Real Food says
Did you store them in the fridge or on the counter? And yes, sharp cheese is best.
Britty says
Okay, so I'm super excited because just the other day I told my hubby that I'm sure I could make crackers. I'm only 21 and my mom never really cooked, so I'm trying. (I made your tortilla recipe the other day, it was amazing!) Anyways, I need to learn to freeze things because my 2 year old and hubby would go through this batch of crackers in a heartbeat. You said you can freeze them...how does that work? You can freeze the actual crackers? How should I do that, like in a freezer bag or something? And for how long and then how would I thaw them out? I'm not good with freezing things yet, it's something I have yet to learn and I'm afraid to waste money by freezing things wrong.
Thanks!
Debbie T says
Britty I would place the crackers on a single layer on a baking sheet and put that in the freezer. In an hour or two, when they are frozen, put them in a freezer bag. They should remain individually frozen so just take out what you need when you want to eat them.
It's awesome that you want to cook for your family! Good luck,
100 Days of Real Food says
That's a great method for freezing as well...thanks for sharing!
100 Days of Real Food says
Sounds like you are getting the hang of cooking... I didn't start cooking until after college (mainly self-taught) so it is never too late! When I freeze things like biscuits, pancakes, crackers I put layers of wax paper in-between and store them in either a Tupperware container or freezer-safe zip lock bag. I will sometimes take them out the night before to thaw or even toast or microwave them if I need them in a hurry. You can freeze LOTS of recipes so it is a great thing to experiment with even if you have a few errors in-between. Good luck!
rachel heldt says
I made these today and my 6 year old, myself, and my dog think they are great. My husband and 4 year old made a face. Oh well, half the family will have to do.