A few readers have shared a homemade “goldfish” crackers recipe with me. I decided to try the recipe (with several modifications), and while the outcome tasted good, the process of rolling out the dough took some time and made a huge mess.

Want to Save this Recipe?
Enter your email below & we'll send it straight to your inbox. Plus you'll get great new recipes from us every week!
As a busy mom I am a big fan of shortcuts, so the goldfish recipe inspired me to come up with these easy cheesy crackers. Making your own “crackers” from scratch sounds like such a daunting task, but trust me…this recipe is ridiculously easy!

Of course if you make this “easy” version you end up with round crackers as opposed to fun little shapes, but the last time I checked my daughters didn’t discriminate against a circle. They were too busy gobbling up these crackers and asking for more to even think about what shape they were eating.
And these are by no means just for kids. There are so many ways to get creative, which would surely impress any adult as well. Before baking experiment with adding some of these spices to the dough:
- black and red pepper
- fresh or dried rosemary
- diced olives
- diced jalapeños.
Or instead of mixing in herbs and spices, just top off the baked cheese crackers with something fun like pesto and grape tomatoes (just like we did for our dinner club last year). No matter what you end up doing, have fun with it and enjoy!
Easy Cheesy Crackers
Ingredients
- 1 cup whole-wheat flour
- 5 tablespoons butter (cold (cut into tablespoon size chunks))
- 1 ½ cups cheddar cheese (grated (the sharper the cheese, the cheesier the crackers))
Instructions
- Preheat oven to 350 degrees F.
- Combine all three ingredients in a food processor and blend. The mixture will eventually turn into one big ball chasing itself around the bowl. Be patient because it can take a few minutes.
- Roll the ball into a log about 1 ½” in diameter. At this point you could refrigerate the dough until later.
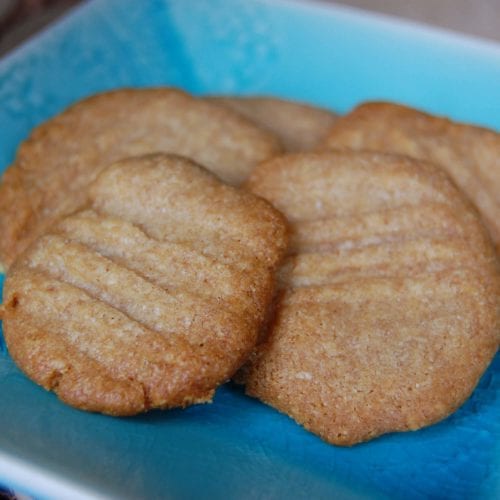
- With a sharp knife slice ¼” thick pieces off the log (pictured above) and place each one flat on an ungreased baking sheet. Try to rotate which side you are cutting down on because the top of the log does start to flatten a little. It is like your very own homemade slice and bake!
- If you want your crackers to look a little fancy (as pictured above) take a fork and gently mash down the top of each one before baking.
- Bake for 8 - 14 minutes or until golden brown. The thicker the crackers the longer it will take.
These crackers can be stored in the freezer so double the recipe and save some for later!
Notes
Nutrition Facts
Entered on Food Renegade's Fight Back Friday


Krystal says
Thanks for the recipe! I just finished up my second batch. My family did ask that I make them thinner. The dough is a bit sticky so I ended up rolling it between two sheets of parchment paper. Then I used my pastry cutter to cut them into square crackers with 'pretty' edges. I baked them until crispy and slightly brown.
SO yummy!! Thanks again for the recipe. Definitely one I'll be keeping.
Trudy says
I'd love to try these, but we are a gluten free household. Has anyone tried making these with tapioca, rice, or potato flours?
jlfowler says
http://glutenfreepdx.wordpress.com/2011/04/25/gluten-free-cheez-bits-cheez-its/
GF "cheez-it" recipe that I've made and they are awesome!
Angela Dacko says
Just made these and they're awesome! I think they taste just like "Goldfish", can't wait til my 4 year-old gets home to see what he thinks of them. Thanks Lisa!!
Abby says
for those who are having trouble, make sure that your cheese is not low moisture... the lower milk content will cause it to be dryer and not stick together. So aged cheddar is probably not conducive to this recipe. try the fresh cheddar blocks :-)
Michelle says
I have this dough in the refrigerator, but the dough is very crumbly. It won't stick. I do not have a food processor. I used my mixer then mixed by hand. It is just falling apart. I squeezed the dough into a log and it is not resting in the frig. I'm hoping that will firm it up. Any suggestions? I used whole wheat, shredded the cheddar cheese, and use cold butter. Thanks. I'll let you know if these came out, but I really doubt it. :-(
Assistant to 100 Days (Jill) says
Hi Michelle. I know it takes a bit in the food processor to all come together, so, that's maybe the only thing I can think of, that not using the processor made the consistency a little different. Sorry I couldn't provide a more definitive answer. Jill
Becca says
I just made these and used Parmesan for half of the cheese before I noticed your problem. I found it very dry, too. I just slowly added in some water and milk and it brought it together fine. Hope this helps anyone else with the same issue!
Angela says
Has anyone tried these with other cheeses?
christy says
This is a general question about shredded cheese. I love fresh shredded but try to get most cooking done on the weekend. Have you frozen cheese that you have shredded yourself? Did it stick together since it doesn't have the additives commercial shredded does? Would love to do big batches and then pull them out as needed. (Plus only one clean-up!)
We're making these right now for the first time. I'm going to do two batches, one in the kitchenaid and one in the food processor and compare. THanks for all the inspiration
Lisa says
I have not frozen cheese before, but readers tell me they do it all the time so I know it works!
HNS says
Just made these with some cheese we had shredded and frozen. We like to buy the good cheese and it turns out cheaper if you buy in bulk. So we shred and freeze. Freezing cheese isn't great if you care what it looks like in the end, but if you're going to just mix it into a recipe or melt it in some grilled cheese it's fine!
Chelsie says
I freeze cheese all the time when I buy in bulk. You can shred it ahead of time and toss it with a tablespoon or two of cornstarch or flour (just enough to keep it from clumping).
Misty says
These turned out wonderful for us. I rolled them out and cut them with a cookie cutter. I was wanting thinner crackers than I thought I would get with the other methods. My kids love them. Should have did a dbl batch because I'm not sure any will be left for my husband to try after work. I'm wondering if the people who had less success with this recipe used pregrated cheese. Its a little drier so maybe that would cause a problem? Just a thought.
Erin says
I have made these twice using my kitchen aid mixer with the paddle attachment (since I don't have a food processor...yet, anyways!). The first time it worked perfectly - after about 5 minutes, the dough came together in a nice big clump. The second time, after 12 minutes the dough STILL had not come together! I added a bit more shredded cheese (about 1/4 cup), and within minutes it was a perfect clump of dough. Just something to try if your dough isn't coming together. Also, I put my dough in the freezer for about 20 minutes before slicing - makes it SO much easier. Then, I sprinkle the crackers with sea salt before baking. Delicious!
Stacy says
my crackers are not cooking right. They are supposed to crisp up in that short time right? Mine didn't crisp at all, the just got overcooked on the bottom. Like cookies. Maybe my flour is bad? Not sure what happened. :(
Michelle L says
These are baking right now! They smell delicious. My dough would not form a ball so I added the tiniest bit of ice water and it did the trick. I am interested in making a huge batch for when school starts. We've made your pop tarts - love those and banana bread!! YUUMO thanks
Malea says
I've made similar crackers before, but with much more complex recipes. I don't have whole wheat flour, and am allergic to parm. cheese though so I subbed white flour, margarine, and 2/3 C nutritional yeast plus a tsp ground mustard, tsp garlic powder, and tsp dried crushed basil. It took a bit of extra margarine and some water, and I ended up having to knead it by hand. Just wouldn't come together in a ball in the food processor. But...they turned out delicious! :)
Stacy says
which attachment would you use for the stand mixer? Paddle? Dough hook? We ran out of Goldfish (FINALLY!) and I want to make these for the kids instead. We don't have a food processor. We have a blender and a kitchen aid. Thanks!
PK says
I used the paddle for most of the mixing. The hook didn't really do anything for me, so I swapped back and forth a few times. Like the recipe says, just be patient with the mixer. It took a bit and right when I was about to pull everything out and hand mix it started clumping up pretty well.
Cheers,
PK
Karlie says
I tried in my kitchen aid to no result, ended up zapping it just a bit in the microwave to melt the butter just a hint so I could do it by hand. That worked, I think they are bit too crumbly having been done that way, however my husband is really impressed by them. Next time I may just add a little milk so it can be done in the mixer easily.
Lindsay says
My first official real food baking experiment. These were so easy to make and I can't believe how amazing they taste. I used my Kitchenaid mixer. It worked just fine. Just takes a bit. Will make these again very soon!
Jennie says
Thanks so much for all the great recipes and ideas on this site. Quick (and maybe dumb) question about this recipe...when you say the crackers can be stored in the freezer, do you mean the dough or the cooked crackers? Thanks!
100 Days of Real Food says
Not a dumb question at all! I've only stored the cooked crackers myself, but I think you could freeze the dough as well. Definitely experiment with a small piece to see what happens!
Erin says
First off, just have to say that I LOVE your blog - it has actually changed my life (and that of my family)! Thank you! Secondly, I just made these cheese crackers and they are excellent. I tasted some of the dough before I baked it and was a little worried, but once they came out of the oven they were great. I found that they are best when you slice them REALLY thin (easiest way is to freeze the dough first), and bake them until they are well done and brown on top. I also sprinkled some sea salt on top before baking. Wonderful recipe, thanks for sharing.
Jenny says
I finally made the easy cheesy crackers! I've been very reluctant, I'm still fairly new to cooking with whole wheat flour, and was worried about the texture and taste. Wow! They are great! I don't own a food processor (it's on my list for Santa) so I used my stand mixer. Took close to 10 minutes, but it came together in a big dough ball that you described.
My oldest, 17, was very reluctant to even try one, he doesn't like whole wheat anything (except your bread recipe, he loved it) and he was surprised, said they were good. Can't wait for my 8 & 4 year old to try them.
Paula says
Ummmm ... not sure how everyone had such great success. These sound wonderful --- but they were a mess. I double-checked the measurements, the food processor -- even after 10 min of blending left me with a crumbled mess ... tried forming the dough up in a cookie press -- it just would not hold together ... had to throw it out, the "log I finally ended up with after pressing it into shape in wax paper, was impossible to cut, it just crumbled ... what's the secret? They sound great, I would love to be able to make my own crackers!
100 Days of Real Food says
Sorry to hear that it didn't turn out...you could try adding some milk if you aren't able to get your dough to come together.
Kristi Vegt says
altitude makes a huge difference in recipes... maybe that's a factor?
Karen says
Try adding more butter. Mu dough was crumbly and wouldn't form up, but I added more butter and it worked out great.
K says
I had the same problem, mixed in the food processor for about 20 minutes, then tried by hand. Mine are in the oven now. When I make these again, I will try adding a bit of milk, also I think my food processor was too small.
Keri says
Finally made these today. They are so delicious. Thank you for all the great recipes!
Trish K says
I'm going to have to try and make these, they look easy and yummy! You can use unminted wax floss to slide it through the cheese that way it won't mash it down, works like a dream!
Twinkle Teacher says
Ooooo, can't WAIT to try these!!!
Bethany says
For some reason, these just didn't work out for me. I had to add another tablespoon of butter since the dough wasn't sticking to itself (too dry) and then they were yummy right out of the oven but about 20 minutes later, were too crumbly and stale tasting. Where did I go wrong?
100 Days of Real Food says
Did you follow the recipe exactly?
Bethany says
Yes, exactly. Until the dough wouldn't stick so I added that one more tbsp of butter, but I don't think that would make it stale quickly.
100 Days of Real Food says
I am sorry to hear that. The other thing I am thinking is maybe the flour went bad? Do you keep it in the fridge or freezer?
Bethany says
I didn't know that flour could go bad. It didn't seem to mess up any other recipes, but maybe I will try again with some fresh flour. Thanks.
Katie says
How long do these last if stored in baggies? I'm sure they won't last long, just checking though.
100 Days of Real Food says
I think they would be best within a week.
melissa says
Thanks for the recipe! In the oven as I write!! Making Hello Kitty cookie cuter version today, trying it out for my daughter's birthday party. Can't wait to see what my kids think..
Julie says
I made the dough log in some plastic wrap and then chilled it for a few minutes. They came out perfect!
Melanie says
I made these today and they were SO delicious! I am trying to follow a more whole food diet but I love cheesy crackers (goldfish and the bunnies). These are a great alternative and sooo good that I had to stop myself from eating the whole batch. Thanks for all of your hard work and research. I love being in the kitchen and making good healthy food for myself ...(and my family when they want to participate). I don't have kids yet, but I'm so glad that I know more about this stuff before I do. That way, they can have a healthier upbringing when the time comes. =)
Candice G says
Hi Lisa, these crackers sound so great. One question though, can i use a kitchenaid mixer instead of a food processor? I dont have a food processor yet. Thanks
100 Days of Real Food says
Hmm....I am not sure if that would work well. You could possibly start it in the mixer then finish it by hand. Let me know how it works out!
Kristi Vegt says
I did it this way, but had to get the clumping started with some milk for moisture... worked great.
Rachel (De Ma Cuisine) says
I'm wondering about using something other than a food processor too. I don't have one. I don't have a mixer either... I have an Immersion blender, might that work?
100 Days of Real Food says
It's hard to imagine an immersion blender working, but you could certainly experiment (and use your hands to form the dough as well)
Rachel (De Ma Cuisine) says
I just had a birthday... maybe I'll use birthday money to get a food processor. :)
100 Days of Real Food says
Go for it...I use mine all the time!
Rachel - De Ma Cuisine says
I got a hand blender from KitchenAid that has a food processor-like attachment. I used it. Worked great. Crackers are in the oven right now. Can't wait to try them!!
Karen says
Candace,
I used a pastry cutter to cut the butter in and then formed the dough ball by hand. It was actually a fairly quick process.
Michelle says
Made these again today, again with the white cheddar. Just as awesome and cheesy as the first batch a couple weeks ago. I baked them for 15 minutes and then let them stay in the oven for several minutes (10?) after I shut it off. They were crispy and wonderful, even using a different (and bigger) attachment on the cookie press. I love this recipe!
Noel says
I just made these today... Then read through the comments to see if anyone had tried them with other cheeses. love the idea of the cookie press to make them fancy!
brandis says
will a regular blender do just as well as a food processor?
Emily Woodall says
I made these today! So easy! I used my food processor's grating disk to grate the cheese. I switched to the regular blade and added the flour and butter directly into the food processor with the cheese then I formed it into 2 logs(I doubled the recipe) wrapped in parchment paper and froze the logs. After they were hard, I used the slicing disk in my food processor and fed the log in through the tube. It sliced both logs in about 30 seconds perfectly thin and round. I have been baking them in batches all afternoon. They are crispy and delicious! Thanks for the recipe!
100 Days of Real Food says
Wow that is a brilliant idea...freezing them and using the food processor to slice!! I am going to have to try that :)
Chelsie says
We made these today with my niece and had fun trying different shapes. We rolled out the dough really thin and used a small biscuit cutter to cut into circles. My niece used a tooth pick to poke small holes in a design "because crackers have holes." We also made square cheese-its by again rolling out the dough really thin and using a pizza cutter to cut rows and then go the other way to make them square then we pressed with a fork around the edge and then poked the middle with the tooth pick. They are not as cheesy tasting as cheese-its and goldfish but that is because those snacks use artificial flavors and chemicals to make it taste cheesier. They are still super tasty!
Nadine says
I am going to try these but I'll use sprouted whole wheat. Easier to digest and phytates are mostly removed! Thanks for this post!
Sara R says
I kid you not, just yesterday I wondered out loud if I could easily make some cheese crackers. Then today I see this on Pinterest. Now I just need to get a larger food processor and we're good to go! I'm excited.
Katelyn says
I had high hopes but I'm not crazy about them. My 20 month old is eating them though so I guess that counts for something. Despite using extra sharp cheddar, they just didn't seem very cheesy. I think I'll try again with more cheese.
Michelle says
Just made these tonight - it probably took 30 minutes, start to finish. I used a cookie press, white cheddar cheese and whole wheat flour, and they are wonderful. Even my husband loves them. They're almost gone! Thank you!
kim says
I just made these today with my daughter, and she loves them! this is the first thing we have tried from your index of recipes. I am excited to try some more of your recipes! Thanks for your website, I have really enjoyed reading it the last few days when I found it.
Asli says
Made these crackers this afternoon for after school snack and they are delicious! Thanks for the easy, yummy recipe.
Erin Anne says
I just made these crackers today. I just have a mini food processor, so I cut the recipe in half to make it fit in the food processor. They turned out well though:) I love this site!
Carrie says
I made these for the first time today, and I did not believe that they would actually come together, but they did! I've got them chilling right now before I slice them. Thanks!!