Want to Save this Recipe?
Enter your email below & we'll send it straight to your inbox. Plus you'll get great new recipes from us every week!
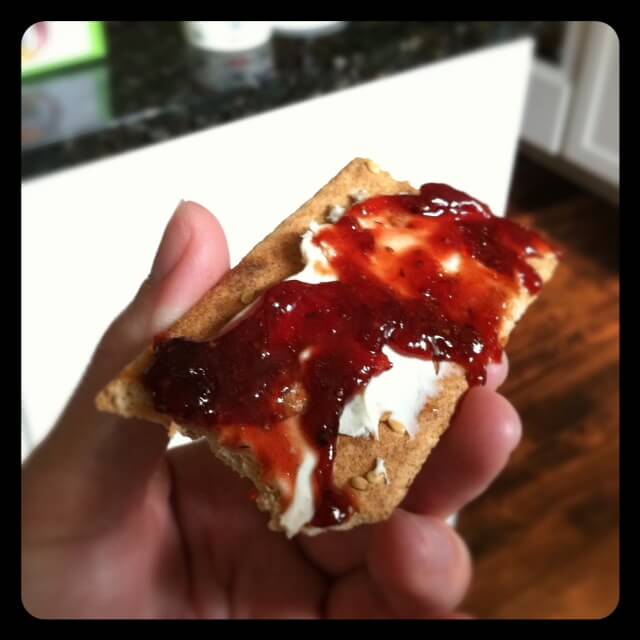
I hope this will be my first of several posts about how to “can” and preserve fresh foods when they are in season. I am a beginner canner myself, but have always been intrigued by and interested in the whole process. Below you'll also find a sugar-free strawberry jam recipe that you can make with just a handful of tools. (You don’t even need to use a canner!)
How to Can Jam Without a Canner: Sugar-Free Jam Recipe
So I recently took a “Canning Class” (led by Ashley Eller at Poplar Ridge Farm) and have also been reading through some other resources, including the Ball Blue Book Guide to Preserving. Prior to my class, I knew absolutely nothing about canning except that I thought it sounded confusing, complicated, and like something that would take an entire day to do (not true!). The recipe I'm sharing today is without pectin, (refined) sugar, or artificial sweeteners.
Featured Comment
I LOVE this jam. It’s really tasty, and the fact that it’s all natural is even better. I’ve never made jam before, so this made it super easy.
From one beginner to another, a few key points on how to can jams:
- In simple terms, canning food is cooking recipes (which most of us already know how to do) and then “processing” the results by putting them in sterilized canning jars and boiling or pressure “cooking” them for a designated amount of time. It really isn’t as complicated as I originally thought. :)
- It is important to use canning recipes from reliable sources. Especially as a beginner these are not recipes you want to modify or adapt in any way because each ingredient as well as both the length of time and temperature at which the jars are processed can be key components to ensuring food safety.
- You must use jars that are in fact suitable for “canning” with two-piece metal lids, which does not include old washed out Ragu spaghetti sauce jars. The most widely used brands of jars for canning are Ball and Kerr, and while the jars and bands (that go around the lid) are reusable you must always use brand new lids to properly can foods. Now I know why I see those packs of lids for sale.
- It is necessary to sterilize the jars and lids before pouring in your jam (or other recipe). You can do this in hot water (180 degrees F), or if you can time things right run the jars and lids/bands through the dishwasher so they are hot and ready right when your recipes are done.
- According to the Ball Blue Book Guide to Canning to process high-acid foods like berries and tomatoes you simply boil them (in the jars), but you actually need to pressure can low-acid foods like asparagus, peas, and corn. So my personal plan is just to stick to the high-acid produce for a while until I really get the hang of things.
- If you aren’t sure if your foods “canned” properly your nose and/or a quick taste test should confirm whether a jar spoiled or not when you open it.
- You certainly can spend your entire day preparing big batches of recipes in order to preserve in-season produce when it’s fresh, but it does not have to be a huge production. In fact, I made a small batch (half the recipe) of the strawberry jam posted below in just over an hour…and I am a newbie. (More of a blueberry jam fan? Find a honey-sweetened recipe here!)
- Please share your canning tips in the comments below…I know some of you have been doing this for many years!
Some helpful tools to make the canning process easier:

The “need to have” canning tools...
- Jars (of course!) – I personally like the versions without shoulders so they are freezer-safe as well. (Hint: if you use the jars for freezing instead of canning be sure to leave room at the top for the liquid to expand.)
- Ball Utensil Set – This set includes a jar funnel, jar lifter, lid lifter, and bubble remover/headspace tool. I found the first three of these items to be invaluable, although I could probably live without the bubble remover/headspace tool (for now).
- A large pot – You’ll need one big enough to hold several sealed jars that could be covered with 1 – 2 inches of water. This does not have to be a “canning” pot (sometimes called a water bath canner)…any big old stockpot will do.
- A ladle – This is necessary to get your jam (or whatever you are making) from the pot to the jar.
- A digital or analog scale – Some recipes call for ingredients in weight measurements, but not all. I have an extremely basic analog scale and to be honest it totally does the trick.
- Potato masher – This was a necessary tool in order to turn my cooked strawberries into yummy, mushy jam.
The “nice to have” tools...
- Basic thermometer – To test the temperature of the water before sterilizing jars/lids.
- Canning rack – This is to lower the jars into and out of the boiling water when you are processing them and to provide space between the bottom of the jars and the pot (you can use other things like jar bands, silverware or even a dish towel to create that space). I don’t personally have one and I survived, but I can see the value if you are going to be doing a lot of canning. Just make sure the size you buy fits your pot if you aren’t getting a set!
- Dissolvable labels – I seriously love these things, but if you can’t justify the expense some regular old masking tape will definitely get the job done.
- Pressure canner – As I mentioned above I don’t see myself “pressure canning” anytime soon, but if you want to preserve low-acid veggies then this is a necessary piece of equipment.
- Immersion blender - you could use this as an alternative to the potato masher, to blend up the ingredients
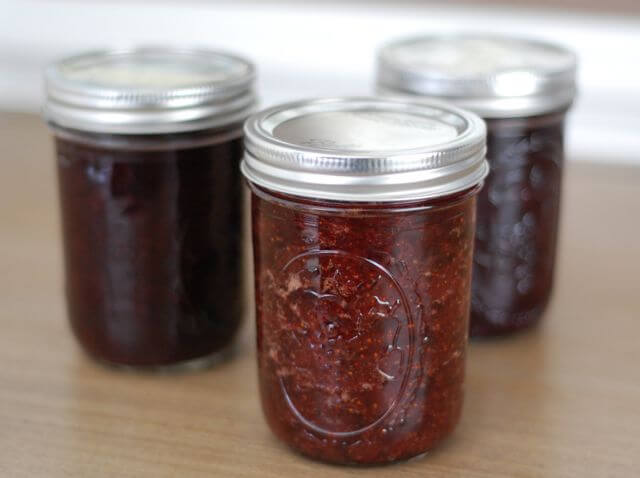
6 Easy Steps to Can Strawberry Jam Recipe Without Sugar and Pectin
- Follow homemade jam recipe (as stated below).
- While it’s cooking sterilize the jars and lids/bands in hot water.
- Ladle the completed jam into hot, freshly sterilized jars one-by-one.
- Add jar lid to the top while keeping the inside sterilized.
- Screw on the bands and add jars to boiling water for 10 minutes.
- Remove jars and listen for the “pop” sound to ensure jar lids have been properly sealed. It’s that simple! :)

Strawberry Honey Jam
Ingredients
- 6 pounds strawberries (or blueberries or other ripe fruit)
- 3 ¾ cup honey
- 1 ½ apples (unpeeled and grated)
- 1 ½ tablespoons lemon juice (freshly squeezed)
Instructions
- Make JamRinse the berries and remove any spoiled or severely blemished ones. Hull strawberries and slice in half.
- Add the berries, honey, grated apple, and lemon juice to a large pot over high heat. Once the mixture comes to a rolling boil, lower to medium heat and allow the mixture to continue to boil lightly for approximately 30 - 60 minutes. The berries will burst and thicken so be sure to scrape the sides of the pot and stir as you go. The longer the jam cooks the thicker the final product will be, although this recipe does not become quite as thick as typical store-bought jam (see note below about adding arrowroot powder or chia seeds for thickening)

- Mash the fruit with a potato masher once the fruit begins to soften. If foam forms on top of the fruit you can skim with a metal spoon and discard if desired.
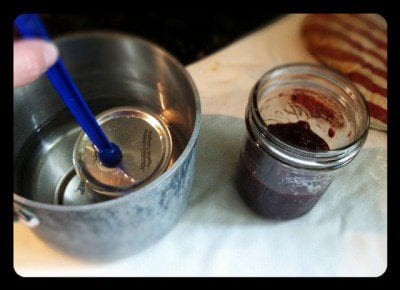
- Prepare Sterile Jars: Meanwhile fill the canning pot ¾ full with water, cover, and bring to a boil over high heat. If you don't have your jars sterilizing in a hot dishwasher you can use this pot of water to sterilize them. Also start a small pot of boiling water to sterilize the lids separately. Be sure to wash all jar pieces in hot soapy water first.
- Once the water is boiling turn off the heat. Test the temperature with your thermometer and when it reaches 180 degrees F put the jars and bands in the large pot and the lids in the small pot. Leave everything in the hot water until ready for use, removing one at a time as needed.
- When the jam is done cooking do a taste test to make sure the thickness and flavor is to your liking. Hint from Ashley: Drop dots of jam on a cold plate, if it seems to set up, it is done. You can also see if it coats the back of a spoon.
- Remove the first jar from the hot water using your jar lifter tool and shake out excess water. Don't touch inside of the jar in order to keep it sterilized. Insert clean canning funnel and ladle the hot jam into the hot jar leaving ¼ inch headspace at the top (this is where the headspace tool can come in handy - leaving more space at the top might not give as good of a seal). If there are any air bubbles you can slide a clean knife along the inside of the jar to remove them. Using a clean rag wipe excess off the outside of the jar and rim.

- Using a magnetic lid lifter pull the first lid out of the hot water and set on top of the jar without touching the bottom of it. Then while only touching the outside of the band screw it onto the jar just firmly enough so it doesn't feel wobbly on the grooves. Repeat until all jars are filled.

- Note (If you don’t want to actually “can” the jam): You could stop here and refrigerate jam for 3 – 4 weeks. To freeze the jam make sure you used freezer-safe jars, (Ball makes plastic jars for this purpose), leave at least a half an inch of space for expansion, allow the jam to completely cool, and put in freezer for up to one year. One additional tip for freezer jam is by placing a round of parchment paper on top of the jam, you can prevent ice crystals from forming.
- Process the Jars:Bring large pot of water back to a boil. Using your jar lifter (or canning rack) carefully lower as many jars that will fit without overcrowding into the boiling water so they are covered by at least 1 - 2 inches of water. It is recommended that the jars do not directly touch the bottom of the pot (so hot water can flow beneath them) and some even suggest putting a dish towel on the bottom to create space. From the moment the water is boiling and the entire first batch of jars are submerged set the timer and process them for 10 minutes.

- When 10 minutes is over use the jar lifter to carefully remove the jars from the water. Put them on the counter and don't move them right away. You will hear your jar lids "popping" which means they have been sealed properly. If jars aren't sealed within 12 hours then move them to the fridge and eat within 3 - 4 weeks.
- Remove bands from sealed jars and with a clean, wet cloth wipe off any jam that has congealed on the outside rim of the jar. This prevents mold from forming on the band. The band can be reapplied, but don’t screw them on too tightly.
- Label jar and store in a cool, dry, dark place for up to 1 year.


Notes
- You can optionally add in arrowroot powder or chia seeds as a way to thicken the jam. If you like jams with crunch, opt for the chia seed addition!
- We recommend organic ingredients when feasible.


Melissa says
This made a lovely blueberry syrup, but didn't thicken up for me. I'm pretty certain it was my altitude, tho. I live at 6500 ft and I usually have to double the boiling times on regular jam. I probably needed to cook it longer. Anyone have any experience with this type of recipe at high elevations? Still not sorry I tried it, the syrup is wonderful, and I canned it, so we can save it for cold, snowy days this winter! :-)
Janet says
Hi,
I am not posting a comment, I am asking a question. With the honey used in the jam making, do I use liquid honey or the solid honey. None of the recipes specify and I really do not want to make all this jam and have it fail because I used the wrong kind of honey.
Thank you,
Assistant to 100 Days (Amy) says
Hi Janet. It is liquid honey. ~Amy
Karla says
Hi Lisa,
I made this recipe with fresh-picked strawberries and local honey; the jam has an odd flavour, not vinegary like a previous poster but it leaves a dry feeling in your mouth as though the jam is high in tannins, similar to a dry red wine. Any idea why? Perhaps I cooked it too long? It did start to burn a little on the bottom of the pan, but I caught it in time and avoided scraping the bottom of the pan when filling the jars. The strawberries were ripe, so I'm thinking it was the honey. Could I make this recipe using (gasp!) white sugar?
Thanks,
Karla
Assistant to 100 Days (Amy) says
Hi there Karla. Not sure what might have gone wrong. I can say, though, that I have over cooked berries when making a sauce with not so delicious results. Also, we've not adapted this recipe with any variation of ingredients. Sorry that I cannot be more helpful on this one! ~Amy
Nicole Merrill says
Sorry - I didn't read the previous posts - I now see the answer to my question. :)
Nicole Merrill says
Lisa, Can this recipe be used for other berries? We are going blueberry picking this weekend and I was wondering if the proportions are the same?
sarah says
this recipe sounds great!! i have a surplus of strawberries, blueberries and peaches to use! i've been reading past comments, and it sounds like blueberries can replace the strawberries well. do you think that peaches would work?
Assistant to 100 Days (Amy) says
Hi Sarah. Lisa recommended not changing the recipe as canning is subject to food safety issues. This recipe was intended for fruit with a high acid content. If you read through reader comments you will see many readers have decided to experiment with various combinations but we've not adapted this recipe for other fruits. ~Amy
malinda says
do i put canend salt in to the jam or how do i keep it fresh all winter
Assistant to 100 Days (Amy) says
Hi Malinda. If you follow the recipe as is you can keep the jam for up to a year. ~Amy
Maegan says
Can I use black raspberries in this recipe? Thanks for all you help and info on eating real food!
Assistant to 100 Days (Amy) says
Hi Maegan. This recipe is for high acid fruit and for food safety reason, Lisa suggests not adapting it. If you read through reader comments, however, you will see that many readers have used other berries and fruits at their own discretion. ~Amy
Dawn says
Do you have a recipe for canning tomato sauce? My tomatoes will be coming very soon and I was going to attempt canning the sauce for the winter months. TIA!
Assistant to 100 Days (Amy) says
Hi Dawn. No, I'm sorry. Lisa's canning adventures are just beginning. :)
~Amy
Debbie says
I used fresh blueberries that we recently picked. It turned out wonderfully. It made more than the recipe said - maybe I used too many berries. I think I used 16 cups (somewhere read that was 6 lbs). ? I processed and canned for holiday gifting. The leftover - well we are eating it, and I froze a bit. I cooked and cooked - it boiled down quite a bit, but I hope it thickened just a bit more in the jars. I cooked much longer than the recipe said. Thanks! Very, very tasty. We have eaten it on Swedish pancakes, toast, and soon to try it on yogurt and ice cream.
Rachel says
I just made 2 batches and they both turned out awesome! Thanks for the recipe! I did cook it for 90 minutes to get it thicker and it worked out great! So yummy!
melissa says
I had no experience with canning prior to trying this receipe. I was eager to attempt homemade natural jelly since my daughter lives on jelly sandwiches. We are going thru a jar a week and since I was trying to buy the most natural store bought version it was costing me a fortune and figured this may save me money plus I know exactly what's in it. So I went out and bought all the required canning items and gave it a whirl. My daughter loves it and I just completed making batch #2 since our strawberry season started. I can't wait to try it again next week when blueberries are ready to pick in our area. My hopes are to have enough in reserve to get us a good chunk thru next school year.
Thank you
Kathy says
Hey Lisa! Thanks for commenting! Yes, the strawberries were about as perfect as they could get. Picked them fresh right out of our garden . . . we're eating the leftovers now and they're awesome. It was some sort of a chemical reaction. They were cooking just fine, covered, and we took the lid off to try to cook off some of the liquid. Within a few minutes, the mixture turned from a beautiful red to almost black, and smelled terrible. Did we just overcook it? It was so bizarre!!
Kathy says
Please help! We were sooooo excited about making this jam, as we had a ton of home grown strawberries as well as honey from our own bees. It was a total flop! What could have gone wrong? From all the other comments, this recipe appears to have worked wonderfully for everyone else, so it must have been something we did. It tastes like vinegar. Awful. I reviewed the ingredients and the directions several times, and I believe we followed it perfectly. Does anyone have ANY idea how this could have happened? I love this site and have made multiple recipes from it with success every time, so, like I said, it must have been our fault, not the recipe's. Have any of you "jam makers" out there ever had this happen? Did we cook it too long? Could it have been something in the homemade honey? (We have eaten many jars of it and loved it, so we know it tastes great.) Any ideas/suggestions would be greatly appreciated as it is my first attempt at making jam, and I LOVE the fact that this jam is not full of sugar! Thanks!!
Lisa says
Kathy - Gosh I am so sorry that happened...what a bummer! Are you sure the berries were good/fresh that you started with?
Plumgirl says
This season we have about 5 plum trees that are all different and full, so I have been learning all I can about canning and what there is to do with all these plums! I have made a ton of pies and just started to make jam with them....however, our family doesn't like to use too much sugar or honey - we actually like the taste a bit less sweet, so I did the recipe with 1/2 cup honey and used powdered pectin - it came out tasty but was a little runnier than I would have liked.
My comment to you Kathy is that maybe you had more lemon than you needed and less sugar/honey than you wanted...plus if you leave all the juices from the fruit in - or as much as possible - while it boils - it makes it much nicer. I think you just have to try it again....I bet it turns out nice the second time
Kelly Smith says
Is it just me or does the 3+ cups of honey make this recipe completely unaffordable?? Especially for those of us that try to buy raw, local honey . . . Would love a more economical option for the average income family that tries to eat clean!
Critical Reader says
Why so complicated?
Pureed strawberries + sugar (honey/refined sugar/etc.) + pectin + acid (lemon/citric acid/ascorbic acid) -> bring to a boil and let it boil for a couple of minutes -> fill into proper sterilized jars -> DONE
No need to cook it forever and also no need to do the canning step.
The type and amount of pectin depends on the ratio of fruit and sugar. "Classical" jam has a a sugar versus fruit ratio of 1:1 and does not require freezing or cooling. A 2:1 ratio (which is used in this recipe) might needs cooling and careful handling after it has been opened. Since I have kids I use sorbic acid, a food preservative, for my 2:1 and 3:1 jams, because the kids are way too messy and therefore 2:1 and 3:1 jams were spoiling too quickly.
Yes, I know, food additives sound scary, but they can be handy. The recipe presented here is a very traditional one followed before pectin was commercially available. Using pectin powder instead of apples (or other fruits high in pectin) reduces cooking time tremendously (a couple of minutes versus 0.5-1.5 h), which makes the whole process much faster and, even more importantly, preserves the vitamins and the flavor. BTW, pectin is isolated from apple or citrus fruit peels, but not from corn dextrose.
Angelique says
Yes, this recipe is more complicated than those using pectin, however for someone like me--with digestive problems and unable to use commercial pectin (I have to follow the Specific Carbohydrate Diet), a recipe like this one is a God-send. :)
Critical Reader says
The gelling agent is the same in both recipes, it is pectin, which naturally occurs in apple peel. I understand that you can't use a recipe if you are sensitive to a certain ingredient. But remember, that any jam basically consists of 4 ingredients: fruit, sugar, acid, pectin. The pectin makes the jam gel. If pectin is an issue for you, you might also react to the pectin in Lisa's recipe, which gets released through the long cooking time.
Kara says
Do you actually have to boil the jars if you're going to freeze it? I would love to use this method but only if I can pour it in after cooking it in the pot....
Assistant to 100 Days (Amy) says
Hi Kara. I know there have been readers who have adapted a similar method for freezing but we have not done so. Here is a non-canned way to preserve berries: https://www.100daysofrealfood.com/2012/06/01/preserving-seasonal-foods-berries/. ~Amy
Angela says
Okay, so I know you said don't mess with recipes, but it seems I'm unable.
I have TONNES of rhubarb this season and want to make a strawberry/rhubarb blend. Do you think the recipe will still 'work'? Say, 2lbs rhubarb and 4lbs strawberries?
Thanks in advance,
~A
Assistant to 100 Days (Amy) says
Hi Angela. Since making changes in the recipe could result in a food safety issue, I can't advise changing it. Many readers have, however, used this the recipe for different high acid berries/fruits. :) ~Amy
Emilie :) says
Strawberry-rhubarb jam is wonderful and I see no reason it would not work with this method :) your ratio sounds really good. Just remember that the addition of rhubarb could affect cooking time. I generally cool a little jam off in the freezer to make sure it is setting well before I finish the rest. Just like with any preserving there should be no safety issue as long as everything is sanitary :)
Alice says
We made this jam with blueberries yesterday. I only made one third of the recipe at this time. It turned out fantastic and was probably the best blueberry jam I have ever made. I did let it cook for 90 minutes instead of 60 because we wanted it to be really thick.
Christy says
Just made a full batch...a-mazing! My kiddos got to help, and they love it.
Erin says
Thank you for an amazing recipe! I like my jam a bit more on the runny side, and this was the perfect consistency! I won't make jam any other way!
Karyn says
I followed the recipe exactly, but the jam would not set at all. I expected it to be runny but not total liquid! I did not want to waste 6 lbs of strawberries and I finally came up with a solution. I added a couple Tbls. of chia seeds to each jar. It did the trick in helping it to gel and it adds a nutritional boost without affecting the flavor. (I am freezing mine not canning. Not sure if it would make a difference in canning).
Amber says
Lisa,
I was wondering, why don't you use pectin? I know that apples are very high in pectin, but I didn't know if there was a reason you avoided conventional pectin.
Also, I'm not sure if you have tried it yet, but I just finished making sugar-free strawberry jam. I used the no-sugar pectin you purchase in the store and didn't add any sweetener whatsoever. My husband and toddler who normally wont eat sugar-free jams have been gobbling it it.
Assistant to 100 Days (Amy) says
Hi Amber. Lisa used apple for the pectin content simply to avoid processed pectin in her first attempt at canning. :) ~Amy
Nicole says
Does it matter what kind of apple you use?? I have organic gala apples
Thanks
Assistant to 100 Days (Amy) says
Hi Nicole. A green apple will give you a higher pectin content. ~Amy
Jenny says
WHat kind of apples are best? sweet? tart? cooking? eating?
Assistant to 100 Days (Amy) says
Hello Jenny. Lisa used a green apple for its high pectin content. ~Amy
Julie says
A friend of mine, who is a very experienced canner, looked at this recipe and told me to be especially careful with sterilizing my tools/jars because honey has a lot of bacteria in it. Has anyone had problems with this? I'm a little worried about the safety of it now.
laura says
Honey is actually a natural anti-bacterial, anti-fungal agent. WE use it on boo-boos here and they heal up very quickly!
Ronn says
I found a really good deal on peaches but i'm new at canning and weary about following the recipes. I'm wanting to try this recipe because i don't eat refined sugars and I prefer using all natural ingredients. think it would work?
Assistant to 100 Days (Amy) says
Hi Ronn. This method is intended for high acid produce. I'm not sure where peaches fall on the acid/ph scale. ~Amy
Ronn says
After doing some research I found that peaches have a 3.4 -4.1 acid range and that falls within the acid range of strawberries at 3.0-3.9. I made it, and it really was excellent. Wonderful recipe! I will make it with berries next time too. The jars sealed nicely. So I'll see how it keeps. It was a good experiment. Thank you!
Katie says
I made this with about 2 lbs of strawberries, less than 1/2 cup of honey, I peeled my apples before grating (was still very thick) and it is amazing! My kids loved it. I also used it as the filling for homemade nutrigrain bars and it was perfect. Thank you!
aidee says
Hello! I am trying to make some fig jam, as i have two fig trees and have so many figs!!! I am new to this... and very confused about pectin... I want to make it as healthy as possible, do you have any fig jam recipe? Thanks a lot! Love your blog!
Assistant to 100 Days (Amy) says
Hi Aidee. Lisa does not have a recipe for fig jam. This particular recipe is for high acid produce. ~Amy
Ashley Daily says
I was curious about the apple, being unpeeled, does the skin just break down enough that it doesn't have an unpleasant texture? Or can I peel it? I just don't want apple skin pieces floating around in my strawberry jam I guess:P
Assistant to 100 Days (Amy) says
Hi Ashley. The peel does break down. You need it for its natural pectin as well. ~Amy
Heather says
My mom has always just turned her jars upside down and skipped canning the jam because it was so hot. In my mom's recipe she only cooked the jam for a few minutes, because she used an artificial thickener. I'm sure that would work for this recipe due to the long cooking time.
Rich Murray says
Very good article that explains the process very well. I have found that cleaning the jar rims after the jars are filled and before the lids are placed on (between steps 3 and 4) helps ensure a proper seal.
Amanda says
So I am ready to do this recipe and I realized it says 6 lbs strawberries. Well I already washed, hulled, sliced my fresh strawberries and frozen them since at the time it was too hot to can. I have no idea what the equivalent is 6lbs fresh to ___ cups frozen sliced? (Well they are thawed now.)
Julie says
I made this exactly how the recipe calls (only halved) and it was perfect! I used Ball freezer jars instead and simply froze it after it was completely cooled. Amazing. I've been using it on sandwiches and stirred into my oatmeal in the mornings. I'm planning to use it in homemade poptarts soon as well.
Question: Can this be sweetened with 100% white grape juice in place of honey? Are the measurements the same?
Thanks!
Assistant to 100 Days (Amy) says
Hi Julie. Glad you had success with your jam. Two thoughts on using grape juice: it will not be as sweet as honey nor will the consistency be the same. You could try but I can't predict the results. Plus, Lisa says that it is not a good idea to adapt the recipe for food safety reasons. ~Amy
Julie says
Thanks for responding, it was a flop. :) Oh well....I ran out of honey and used the white grape juice to replace what I didn't have and it just didn't set up like the previous batch did. It will get used for oatmeal, quinoa, etc. but I'll make another batch with all honey from this point forward. Thanks again!
Jody says
I am hoping to make freezer jam since I am not confident in my canning abilities. Can this same recipe just be done and then jars frozen? I saw a little bit about this in your post but wanted to be sure it would work out and then I wouldn't have to use the regular pectin recipe.
Assistant to 100 Days (Amy) says
Hi Jody. We have not tried the freezing method but several readers say that it will work just fine. ~Amy
Karis says
Tried this last night and it was heavenly!!! Although my batch made closer to 10 pints so I was scrambling to find more jars and lids haha. Has anyone ever tried the canning method where you simply put the lids and rings on and then turn them upside down overnight? The heat of the cooked jam supposedly is enough to seal them. My mom tried it once for jam and said it worked great (and saved alot of time) but she couldn't remember what the stipulations were for when you can do it
Kate says
Hi Karis,
That's exactly how my mum and I used to make jam (now it's me and my kids:-)). You fill the jars with jam, put on the lid (we only used screw on lids) and turn the jars upside down on a tea towel till they are cooled down. We never had any problems with mold or anything else. just make sure you leave a little bit of space in the jarsand that they are completely cooled down before turning them over again. Works a treat.
Amber says
Karis,
My mom and I did a lot of research on this last year when we were canning, because this was a common practice when she was growing up. While it probably is alright new research indicates that it is safer to actually process the food in a canner. My mom and I did a batch of pickles with the canner and a batch with the upside down method, and 6 months later we definitely noticed a difference in the quality of the food. Since my toddler eats the food that I can for me its worth actually canning.
Elizabeth says
My old Better Homes & Garden canning book says to invert the jars for 5 minutes, then turn upright. I just did this today with apricot jam and all the jars sealed within an hour.
Assistant to 100 Days (Amy) says
Hi GD. You always need to use fresh new lids when canning. ~Amy
GD says
If I make this jam to freeze for later, is it safe to reuse the old lids?
Meg says
Thank you! I've been madly trying to eat all the strawberries that are in season right now because I didn't want to use pectin, and didn't know how long to set aside to learn to make/can jam. Definitely doing it now!
Sarah says
What type of apples were used? Is there a kind thats best for this recipe?
- On a side note, i LOVE this site, i've been looking for recipes that make jam without all that sugar. :) THANK YOU!!
Assistant to 100 Days (Amy) says
Hi Sarah. Lisa used green apples for their high pectin content. Enjoy. ~Amy