Want to Save this Recipe?
Enter your email below & we'll send it straight to your inbox. Plus you'll get great new recipes from us every week!
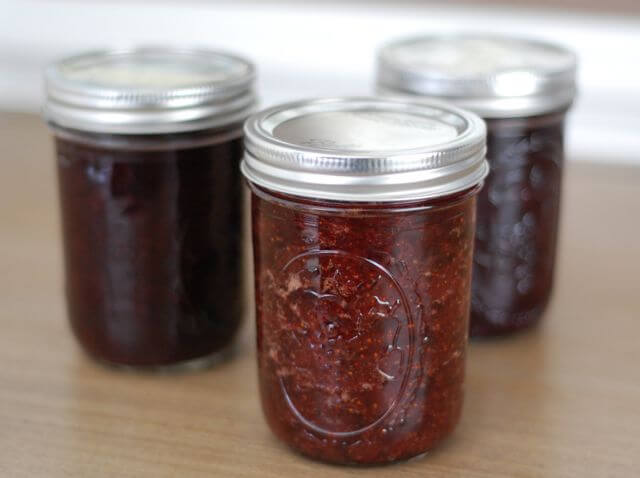
I hope this will be my first of several posts about how to “can” and preserve fresh foods when they are in season. I am a beginner canner myself, but have always been intrigued by and interested in the whole process. Below you'll also find a sugar-free strawberry jam recipe that you can make with just a handful of tools. (You don’t even need to use a canner!)
How to Can Jam Without a Canner: Sugar-Free Jam Recipe
So I recently took a “Canning Class” (led by Ashley Eller at Poplar Ridge Farm) and have also been reading through some other resources, including the Ball Blue Book Guide to Preserving. Prior to my class, I knew absolutely nothing about canning except that I thought it sounded confusing, complicated, and like something that would take an entire day to do (not true!). The recipe I'm sharing today is without pectin, (refined) sugar, or artificial sweeteners.
Featured Comment
I LOVE this jam. It’s really tasty, and the fact that it’s all natural is even better. I’ve never made jam before, so this made it super easy.
From one beginner to another, a few key points on how to can jams:
- In simple terms, canning food is cooking recipes (which most of us already know how to do) and then “processing” the results by putting them in sterilized canning jars and boiling or pressure “cooking” them for a designated amount of time. It really isn’t as complicated as I originally thought. :)
- It is important to use canning recipes from reliable sources. Especially as a beginner these are not recipes you want to modify or adapt in any way because each ingredient as well as both the length of time and temperature at which the jars are processed can be key components to ensuring food safety.
- You must use jars that are in fact suitable for “canning” with two-piece metal lids, which does not include old washed out Ragu spaghetti sauce jars. The most widely used brands of jars for canning are Ball and Kerr, and while the jars and bands (that go around the lid) are reusable you must always use brand new lids to properly can foods. Now I know why I see those packs of lids for sale.
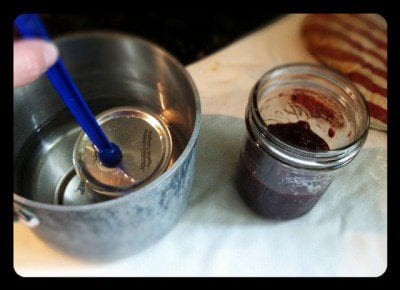
- It is necessary to sterilize the jars and lids before pouring in your jam (or other recipe). You can do this in hot water (180 degrees F), or if you can time things right run the jars and lids/bands through the dishwasher so they are hot and ready right when your recipes are done.
- According to the Ball Blue Book Guide to Canning to process high-acid foods like berries and tomatoes you simply boil them (in the jars), but you actually need to pressure can low-acid foods like asparagus, peas, and corn. So my personal plan is just to stick to the high-acid produce for a while until I really get the hang of things.
- If you aren’t sure if your foods “canned” properly your nose and/or a quick taste test should confirm whether a jar spoiled or not when you open it.
- You certainly can spend your entire day preparing big batches of recipes in order to preserve in-season produce when it’s fresh, but it does not have to be a huge production. In fact, I made a small batch (half the recipe) of the strawberry jam posted below in just over an hour…and I am a newbie. (More of a blueberry jam fan? Find a honey-sweetened recipe here!)
- Please share your canning tips in the comments below…I know some of you have been doing this for many years!
Some helpful tools to make the canning process easier:

The “need to have” canning tools...
- Jars (of course!) – I personally like the versions without shoulders so they are freezer-safe as well. (Hint: if you use the jars for freezing instead of canning be sure to leave room at the top for the liquid to expand.)
- Ball Utensil Set – This set includes a jar funnel, jar lifter, lid lifter, and bubble remover/headspace tool. I found the first three of these items to be invaluable, although I could probably live without the bubble remover/headspace tool (for now).
- A large pot – You’ll need one big enough to hold several sealed jars that could be covered with 1 – 2 inches of water. This does not have to be a “canning” pot (sometimes called a water bath canner)…any big old stockpot will do.
- A ladle – This is necessary to get your jam (or whatever you are making) from the pot to the jar.
- A digital or analog scale – Some recipes call for ingredients in weight measurements, but not all. I have an extremely basic analog scale and to be honest it totally does the trick.
- Potato masher – This was a necessary tool in order to turn my cooked strawberries into yummy, mushy jam.
The “nice to have” tools...
- Basic thermometer – To test the temperature of the water before sterilizing jars/lids.
- Canning rack – This is to lower the jars into and out of the boiling water when you are processing them and to provide space between the bottom of the jars and the pot (you can use other things like jar bands, silverware or even a dish towel to create that space). I don’t personally have one and I survived, but I can see the value if you are going to be doing a lot of canning. Just make sure the size you buy fits your pot if you aren’t getting a set!
- Dissolvable labels – I seriously love these things, but if you can’t justify the expense some regular old masking tape will definitely get the job done.
- Pressure canner – As I mentioned above I don’t see myself “pressure canning” anytime soon, but if you want to preserve low-acid veggies then this is a necessary piece of equipment.
- Immersion blender - you could use this as an alternative to the potato masher, to blend up the ingredients
6 Easy Steps to Can Strawberry Jam Recipe Without Sugar and Pectin
- Follow homemade jam recipe (as stated below).
- While it’s cooking sterilize the jars and lids/bands in hot water.
- Ladle the completed jam into hot, freshly sterilized jars one-by-one.
- Add jar lid to the top while keeping the inside sterilized.
- Screw on the bands and add jars to boiling water for 10 minutes.
- Remove jars and listen for the “pop” sound to ensure jar lids have been properly sealed. It’s that simple! :)

Strawberry Honey Jam
Ingredients
- 6 pounds strawberries (or blueberries or other ripe fruit)
- 3 ¾ cup honey
- 1 ½ apples (unpeeled and grated)
- 1 ½ tablespoons lemon juice (freshly squeezed)
Instructions
- Make JamRinse the berries and remove any spoiled or severely blemished ones. Hull strawberries and slice in half.
- Add the berries, honey, grated apple, and lemon juice to a large pot over high heat. Once the mixture comes to a rolling boil, lower to medium heat and allow the mixture to continue to boil lightly for approximately 30 - 60 minutes. The berries will burst and thicken so be sure to scrape the sides of the pot and stir as you go. The longer the jam cooks the thicker the final product will be, although this recipe does not become quite as thick as typical store-bought jam (see note below about adding arrowroot powder or chia seeds for thickening)

- Mash the fruit with a potato masher once the fruit begins to soften. If foam forms on top of the fruit you can skim with a metal spoon and discard if desired.
- Prepare Sterile Jars: Meanwhile fill the canning pot ¾ full with water, cover, and bring to a boil over high heat. If you don't have your jars sterilizing in a hot dishwasher you can use this pot of water to sterilize them. Also start a small pot of boiling water to sterilize the lids separately. Be sure to wash all jar pieces in hot soapy water first.
- Once the water is boiling turn off the heat. Test the temperature with your thermometer and when it reaches 180 degrees F put the jars and bands in the large pot and the lids in the small pot. Leave everything in the hot water until ready for use, removing one at a time as needed.
- When the jam is done cooking do a taste test to make sure the thickness and flavor is to your liking. Hint from Ashley: Drop dots of jam on a cold plate, if it seems to set up, it is done. You can also see if it coats the back of a spoon.
- Remove the first jar from the hot water using your jar lifter tool and shake out excess water. Don't touch inside of the jar in order to keep it sterilized. Insert clean canning funnel and ladle the hot jam into the hot jar leaving ¼ inch headspace at the top (this is where the headspace tool can come in handy - leaving more space at the top might not give as good of a seal). If there are any air bubbles you can slide a clean knife along the inside of the jar to remove them. Using a clean rag wipe excess off the outside of the jar and rim.

- Using a magnetic lid lifter pull the first lid out of the hot water and set on top of the jar without touching the bottom of it. Then while only touching the outside of the band screw it onto the jar just firmly enough so it doesn't feel wobbly on the grooves. Repeat until all jars are filled.

- Note (If you don’t want to actually “can” the jam): You could stop here and refrigerate jam for 3 – 4 weeks. To freeze the jam make sure you used freezer-safe jars, (Ball makes plastic jars for this purpose), leave at least a half an inch of space for expansion, allow the jam to completely cool, and put in freezer for up to one year. One additional tip for freezer jam is by placing a round of parchment paper on top of the jam, you can prevent ice crystals from forming.
- Process the Jars:Bring large pot of water back to a boil. Using your jar lifter (or canning rack) carefully lower as many jars that will fit without overcrowding into the boiling water so they are covered by at least 1 - 2 inches of water. It is recommended that the jars do not directly touch the bottom of the pot (so hot water can flow beneath them) and some even suggest putting a dish towel on the bottom to create space. From the moment the water is boiling and the entire first batch of jars are submerged set the timer and process them for 10 minutes.

- When 10 minutes is over use the jar lifter to carefully remove the jars from the water. Put them on the counter and don't move them right away. You will hear your jar lids "popping" which means they have been sealed properly. If jars aren't sealed within 12 hours then move them to the fridge and eat within 3 - 4 weeks.
- Remove bands from sealed jars and with a clean, wet cloth wipe off any jam that has congealed on the outside rim of the jar. This prevents mold from forming on the band. The band can be reapplied, but don’t screw them on too tightly.
- Label jar and store in a cool, dry, dark place for up to 1 year.


Notes
- You can optionally add in arrowroot powder or chia seeds as a way to thicken the jam. If you like jams with crunch, opt for the chia seed addition!
- We recommend organic ingredients when feasible.


Amanda says
Thank you so much for this recipe! Every year I make lots of Jam and never liked the pectin you had to use! I made this and it was heavenly! Thanks!
Caroline says
I am so glad that you posted this recipe, I am totally new to canning this year and was appalled at the amount of sugar used in all the recipes I have seen. I am now really looking forward to trying this recipe as soon as my strawberries start to produce.
Charity says
I only do water bath canning at this point, but I love this site and FB page, because small batching canning is so EASY!
https://www.facebook.com/pages/SB-Canning/130750240327122
http://www.sbcanning.com
Lori says
I had a question. I started making this and seems like the berries were too thick for my liking so I strained them, pureed them and added them back to 75% of the liquid. I was afraid it was going to be too runny with ALL the liquid. As I am cooking it down, I think it is not concentrating. Should I just keep cooking it down? Also, would it work if next time I just forego adding the liquid back in and left the puree be canned instead. Seems like that would have made excellent jam all on its own.
Christine says
One of the reasons this recipe works, is that fruit has a natural pectin in it. Your straining may have taken out part of the fruit. Also, puréeing the fruit will add lots of air, and might oxidize (turn fruit brown). Cooking it down will gradually take out the excess liquid, making it as thick as you like.
Lisa says
It's hard to say since you changed the recipe a little...I have only made it the way it's stated and been happy with the results.
Piper says
Amy, how much jam did this recipe make? I need to plan how many jars/lids I will need. Thanks!
Assistant to 100 Days (Amy) says
Hi Piper. It makes 6 pints. Enjoy. ~Amy
Erin says
I just made this for the second time and am obsessed with it and so grateful to you, Lisa! I grew up on grandmas freezer jam (which I loved) but that is loaded with refined sugar and sure gel (owned ny Kraft!!). Thanks so much for a better option for my family!!
Sandy Jarvis says
Just had this strawberry blueberry jam on my whole wheat pancakes this morning! Delicious...I can taste the freshness and sweet goodness.
Mary says
Let me fist say that I am so inspired by your blog and FB page! I really want to try this jam for the "pop tarts" recipe, but I live overseas in an area where it is very difficult to find good, fresh strawberries let alone 6 pounds. Can I mix strawberries, blueberries, raspberries, and blackberries? I noticed you said not to modify recipes. Also, can I half it and still get the same result? Thank you so much!
Assistant to 100 Days (Amy) says
Hi Mary. While I don't see why you wouldn't be able to combine those berries as long as they all have similar acid content, I have to caution that making changes to this recipe or any canning recipe might result in a food safety issue. ~Amy
Elizabeth Bishop says
Just made this for the first time on Saturday! I have never canned before and was very scared but it turned out perfect. I loved the consistency it wasn't too runny for me and worked perfectly on bread etc. I LOVE the taste. It is sweet and tart and doesn't taste sugary like store bought jam! Thanks for this recipe and I can't wait to try this with blueberries!!! Yum!!
Christine says
hi Lisa!
I love your website! I have been canning since I was little. Recently, however, I discovered, that many of the things I was doing were wrong. I was actually putting my family in bigger danger by canning improperly. Contact your local Extension office. They have people who teach how to safely can the foods you want, the way you want them. I did 6 years ago, and since then I have become a Master Food Preserver, and wow! What a difference. I don't have to worry about poisoning my family with the healthy foods I put up. (one example, NEVER taste a food that you are not sure about. Sometimes, only one germ is needed to paralyze you for life.) When you are looking for recipes, and times, only use extension recipes....they have been tested for safety. Here is one of their websites: http://nchfp.uga.edu Contact me if you can't find someone, and I'll hook you up with the ones I know about. Thanks for pushing home canning....what a great idea!
Alexandra says
Can I make the recipe and put in a plastic container and stick it in my fridge without doing any canning? I don't have any canning supplies but want to make jam.
Christine says
Yes, or freeze it for later.
Mama765 says
We made this with strawberries and loved it! We just picked blueberries today and can't wait to try it with them. Thanks!
steph says
was excited to try this, but a little disappointed at how runny it is. We'll be able to use it at home on toast, but won't be able to use it on a sandwich for kiddos lunches. Also, I taste more honey than strawberries. I have 8 containers of it in the fridge/freezer! I think it will be good on pancakes or ice cream though.
Jessica says
I normally use raw honey. If I'm heating it through the process of canning anyway, does it matter if it's raw? I'm only asking because raw honey is pretty spendy...
Assistant to 100 Days (Amy) says
Hi Jessica. Raw honey is not required. ~Amy
Morgan says
Labels bug me - tape or otherwise. So since you can only use the lids once, I just use Sharpie on the lids to know what's inside. For gift giving it's a ribbon around the neck w/a tag.
Liz B says
I have been canning for a few years now. Not a big fan of adding honey and apples because it detracts from the taste.
If you are like me, I highly recommend Pomona's Universal Pectin. It doesn't react on sugar, it reacts on calcium that comes with the pectin. Works like a champ and no added taste.
Also, there are fantastic alternatives to white sugar besides honey. Agave works well, as does turbinado sugar. The latter is fantastic for macerating strawberries for some recipes.
Donna says
I have been canning different things here and there for the past 15 years and my mother canned everything that came out of here garden or came from the BC orchards the whole time I was growing up. The one thing that we both learned was that peach jam is difficult to make! I did however, discover a couple of books called "Small Batch Preserving" and "Put a Lid on it" by Ellie Topp and Margaret Howard. The recipes make 3 cups each and they have many fancy ones that are great for gift giving. You will still have to modify the ones that have white sugar in them but the are several "butter" recipes that use honey or maple syrup, like Apricot Honey Butter or Cranberry Maple Butter.
Kelly says
I'm still a canning newbie - although I did a LOT last summer - but I think the solution if you're really looking for whole fruit/less sugar is to go with a fruit butter as opposed to jam. Unlike jam, fruit butter cooks low and slow and doesn't require "set" so it doesn't require the massive amount of sugar/sweetener. Last year, I made tons of Peach Butter (as well as pear, apricot, apple and blueberry butter) - which you can make in a slow cooker, on the stovetop, or (my favorite) at low temperature in the oven (Food in Jars' author Marisa McClellan's new cookbook has an *awesome* oven-roasted peach butter recipe. The other cooking methods can be found on her website. http://www.foodinjars.com/2009/09/fruit-butters-peaches-pears-and-apples/ AND http://www.foodinjars.com/2010/06/june-can-jam-slow-cooker-blueberry-butter/ AND http://www.foodinjars.com/2010/07/more-on-fruit-butters-in-a-slow-cooker/. I typically only would add a 1/2c of so of (organic cane) sugar to a recipe that used several pounds of peaches or other fruit (even though Marissa called for more sugar). Here's a good explanation of sugar's role in canning: http://www.foodinjars.com/2012/07/canning-101-sugars-role-in-home-preserved-food/. I'm looking forward to trying (very low sugar) canned strawberry butter, and maybe your honey-sweetened strawberry jam this year too!
Erika says
Just a note, I've always been told if you suspect spoilage do NOT taste it. Even just a touch to the tongue can make you very sick if it has botulism.
Shandra Locken says
OMG...I am so excited. Totally going to try this! Especially now that organic strawberries are finally coming down in price. Snagged a 2 lb box from Costco for $5.49 yesterday.
Mimi says
No kidding! Well that just beats all. Strawberry jam is almost embarrassingly easy to prepare so I am excited that cost of organic ingredients is dropping. One more reason to make yummy and healthy food for our families.
Christle says
I have been told that the metal lids are lined with BPA, do you buy BPA free lids & if so what brand?
Laura Wells says
Christle,
Ball recently announced that their new lids are BPA free. Yippee!
Megan says
I just recently found out about and have read 100 Days... and love it! For years I have made Strawberry Jam (ranging from 70-100 jars every year) to give as gifts throughout the year, so I am excited to find a recipe that is "sugar" free and does not use pectin. Being a long time canner I wanted to offer a few easy suggestions for anyone canning in bulk.
- If you are processing a lot of jars you can sterilize the jars ahead of time and keep them warm in the oven while you are preparing the food (200 degree oven)
- If you live in the Raleigh area, there is a local strawberry farm (Hunt's on Watkin's Road) that I love and have been picking strawberries at my entire life. It's a great activity to do by yourself or with kids. They also have pre-picked strawberries if you want to skip the work of picking.
- If you can pick the strawberries yourself, go for the ones that are on the edge of spoiling, the richer the red on the berry the sweeter your jam will be. (Don't pick the ones with white still near the stem.)
Can't wait to try out more recipes on here!
Rachel says
If I am making a smaller batch and don't expect it to last more than a few weeks and do not plan on "canning" or freezing any of it, can I skip using the jars and store in an air-tight container in the fridge? Is is neccesary or is there is benefit to using the canning jars if we don't actually plan on "canning"? Thanks so much!
Sadie says
Yes, you can put it in any airtight container in the fridge, and it will be fine for a week or two. Even when you "water bath" jars of jam, sometimes they don't seal properly...you just put them in the fridge instead of the pantry, and they are fine for a couple weeks.
Melissa says
Can I make a small amount and save in tupperware instead of glass jars?
Sadie says
You can absolutely put jam in a tupperware and put in the fridge for a couple weeks instead of canning it. Or you can freeze it if you make more than you can eat in a couple weeks.
pearl2006 says
My whole family loved this jam! I posted it on my facebook with a link to your site. I only made 1 lb of strawberries though, Here is how much I used.
1 lb strawberries, 1/2 cup honey + 2 tbsp, 1/4 shredded green apple, and 1/4 tbsp lemon juice.
I cooked it for only 30 min, and gave it a quick mash with my potato masher just to make sure everything was all broken up.
Boy my kids loved it! And my 14 month old kept saying "MMMMMMMM" when he was eating it. lol
Abbie says
I'm curious why we want to avoid using pectin. I've looked and I can't find anything on this site as to why we should not use it; I assume it's because it is processed. I have found a few items at the store that would otherwise be acceptable but they have pectin in the ingredient list. Could you shed any light on this for me please? Thanks!
Assistant to 100 Days (Amy) says
Hi Abbie. Commercial pectin is a processed additive but beyond that, it requires an addition of sugar to make it react. That is two strikes against pectin regarding our real food rules. Hope that answers your question. ~Amy
laura says
Pamona's pectin is made from oranges (yes, still processed) and it uses calcium to gel - not sugar.
Sadie says
Hi, I'm interested in making some strawberry jam without refined sugar. I'm concerned that with this much honey, that it would have a definite honey taste. Not to mention that honey is very expensive. I think my family and I would prefer the more mild taste of maple syrup, and I'm wondering if the honey could be replaced with maple syrup (same ratio), or if the amounts would have to be adjusted. Thanks!
pearl2006 says
I made this only using 1 lb of strawberries, I used a little over a 1/2 cup of honey and it did not have any over powering honey taste. It would be worth it to just make 1 lb then if you are happy with it, then do a bigger batch. I commented below with how much I used of each ingredient if you want to give it a go.
Tonight I also used the same recipe but used blue berries instead, came out great, added cinnamon, and ginger.
Assistant to 100 Days (Amy) says
Hello Sadie. If you do decide to exchange, the ratio typically is 1:1. Goodluck. ~Amy
Sadie says
I just wanted to follow-up and say that I made a small batch using honey, and it was good, but I could really taste the honey. I made another batch using maple syrup rather than honey, and it was so good! It tasted much more like "regular" jam with refined sugar. Also, as far as people with watery jam, I kept it simmering until it got to the consistency I wanted. It took a little longer with the maple syrup (over an hour), than it did with honey (about 30 minutes).
Carol says
Tried this today and love it!!! This is my first canning experience, and I thought it was super easy. I have a couple of questions. When I took jars out of boiling water after processing, I heard the pop but couldn't tell which ones "popped". There are 5 jars but only heard two "pops". Is there a way other than hearing pops to tell which ones are sealed? I plan to freeze all 5, just to be safe.
Also, when I buy organic jam at store, it typically lasts for a very long time in refrigerator after we open it (label on store bought organic jar says organic fruit, organic sugar, fruit pectin and citric acid). Why does this recipe only last 3 - 4 weeks in refrigerator after opening (whether opening from being sealed or opening from freezing)? Thanks!
Lisa says
So glad the recipe was a success. You can look at the lids to see if they are indented (which means they popped). The unsealed ones will look different. Also, the difference of the shelf life could be the amounts of the ingredients that they add. Sugar can act as a preservative (maybe they are using a higher quantity). I hope that helps.
Michelle says
This was delicious! I made it with frozen strawberries straight from the freezer. It turned out perfect. It was my first jam making experience....I am so happy to have tried this recipe. Thanks so much for sharing!
Tanya says
Do you know if you can you make this with frozen fruit instead of fresh fruit?
Assistant to 100 Days (Jill) says
Hi Tanya. I have not tried it, sorry. I'm not really sure if it would work or not. I would just make sure if you choose to try it that you purchase frozen fruit with no added sugars. Jill
Alexis says
I love that this recipe doesn't use tons of straight up sugar, could you do it without the honey though? That may be a silly question I've never made jelly but would like to but don't want to add sugar/sweetners to them. Thank you!
Assistant to 100 Days (Jill) says
Hi Alexis. I have never tried it without any sweetener. My only hesitation is that without the honey and pectin I'm not sure it would get thick. Jill
Vonita says
Have you heard about Tattler Canning lids? They're reusable and BPA free.
Assistant to 100 Days (Jill) says
Yes...here is a sponsored post we did with them...https://www.100daysofrealfood.com/2012/06/22/recipe-no-sugar-green-tomato-relish-can-freeze/. Jill
Tyler Pennypacker says
Hi! I was curious besides making your own jam, if you could give me suggestions on healthy store bought jellies (grape) that you purchase for sandwiches?
Assistant to 100 Days (Jill) says
Hi Tyler. Crofter's has an organic jelly...I'm not that familiar with it though to know if it has added sugar, but, it might be worth checking out. Hope that helps. Jill
Grace says
If I don't add honey or any sweetener, will I still be able to make the jam successfully?
Assistant to 100 Days (Jill) says
Hi Grace. You can try it. Without the pectin too, I'm not sure if it will gel quite right. The sweetener I believe also acts as a preservative, so, you may not have as long of a shelf life either. Let us know how it goes. Jill
Erin Rothie says
Thanks so much for your recipe!! I do a lot of canning and usually halve the sugar, but still hate having the refined sugar in it. I'm going to make crockpot cranberry sauce sweetened with honey. I'm excited to try it! I made my last batch with half the sugar and it gelled super well, so I think it has plenty of natural pectin in it to gel well with honey.
Thanks for your healthy living tips!
Molly says
Can you explain what your jam looked like during the cooking process? Was it completely liquid up until it set? Mine is all liquid except for the strawberry chunks. I read reviews of people having the same consistency. I am guessing either something went wrong or maybe your was the same and we just need to hear exactly what yours looked like. :) also - does the apple need to be grated or is any form okay? Thin slices?
Lisa says
Yes, I would grate the apple and this jam does not end up quite as thick as the store bought stuff. I hope that helps!
Heather says
Hey! Do you have a strawberry jam recipe without the honey or is the honey necessary as the sweetener? :)
Assistant to 100 Days (Jill) says
Hi Heather. No, we don't. Yes, the honey adds the sweetness to it. Jill
Alana says
I tried checking through the comments and didn't see anything - I tried this recipe a couple months back (well I made a half batch) and it was delish!! But my favorite jam is Raspberry - would this work and just use 6lb of Raspberries instead of Strawberries?
Assistant to 100 Days (Jill) says
Hi Alana. No reason you couldn't give it a try. I have not done it with raspberries but it may work. Let us know how it goes. Jill
Katie says
Do you think I could make Pomegranate jelly with this recipe?
Assistant to 100 Days (Jill) says
Hi Katie. I have not tried it, but, go for it. Let us know if it works out. Jill
Amber says
I am starting to slowly eliminate GMO's from our cupboards. This is a great way for me to use local products to feed my family a little healthier.