Want to Save this Recipe?
Enter your email below & we'll send it straight to your inbox. Plus you'll get great new recipes from us every week!
I hope this will be my first of several posts about how to “can” and preserve fresh foods when they are in season. I am a beginner canner myself, but have always been intrigued by and interested in the whole process. Below you'll also find a sugar-free strawberry jam recipe that you can make with just a handful of tools. (You don’t even need to use a canner!)
How to Can Jam Without a Canner: Sugar-Free Jam Recipe
So I recently took a “Canning Class” (led by Ashley Eller at Poplar Ridge Farm) and have also been reading through some other resources, including the Ball Blue Book Guide to Preserving. Prior to my class, I knew absolutely nothing about canning except that I thought it sounded confusing, complicated, and like something that would take an entire day to do (not true!). The recipe I'm sharing today is without pectin, (refined) sugar, or artificial sweeteners.
Featured Comment
I LOVE this jam. It’s really tasty, and the fact that it’s all natural is even better. I’ve never made jam before, so this made it super easy.
From one beginner to another, a few key points on how to can jams:
- In simple terms, canning food is cooking recipes (which most of us already know how to do) and then “processing” the results by putting them in sterilized canning jars and boiling or pressure “cooking” them for a designated amount of time. It really isn’t as complicated as I originally thought. :)
- It is important to use canning recipes from reliable sources. Especially as a beginner these are not recipes you want to modify or adapt in any way because each ingredient as well as both the length of time and temperature at which the jars are processed can be key components to ensuring food safety.
- You must use jars that are in fact suitable for “canning” with two-piece metal lids, which does not include old washed out Ragu spaghetti sauce jars. The most widely used brands of jars for canning are Ball and Kerr, and while the jars and bands (that go around the lid) are reusable you must always use brand new lids to properly can foods. Now I know why I see those packs of lids for sale.
- It is necessary to sterilize the jars and lids before pouring in your jam (or other recipe). You can do this in hot water (180 degrees F), or if you can time things right run the jars and lids/bands through the dishwasher so they are hot and ready right when your recipes are done.
- According to the Ball Blue Book Guide to Canning to process high-acid foods like berries and tomatoes you simply boil them (in the jars), but you actually need to pressure can low-acid foods like asparagus, peas, and corn. So my personal plan is just to stick to the high-acid produce for a while until I really get the hang of things.
- If you aren’t sure if your foods “canned” properly your nose and/or a quick taste test should confirm whether a jar spoiled or not when you open it.
- You certainly can spend your entire day preparing big batches of recipes in order to preserve in-season produce when it’s fresh, but it does not have to be a huge production. In fact, I made a small batch (half the recipe) of the strawberry jam posted below in just over an hour…and I am a newbie. (More of a blueberry jam fan? Find a honey-sweetened recipe here!)
- Please share your canning tips in the comments below…I know some of you have been doing this for many years!
Some helpful tools to make the canning process easier:

The “need to have” canning tools...
- Jars (of course!) – I personally like the versions without shoulders so they are freezer-safe as well. (Hint: if you use the jars for freezing instead of canning be sure to leave room at the top for the liquid to expand.)
- Ball Utensil Set – This set includes a jar funnel, jar lifter, lid lifter, and bubble remover/headspace tool. I found the first three of these items to be invaluable, although I could probably live without the bubble remover/headspace tool (for now).
- A large pot – You’ll need one big enough to hold several sealed jars that could be covered with 1 – 2 inches of water. This does not have to be a “canning” pot (sometimes called a water bath canner)…any big old stockpot will do.
- A ladle – This is necessary to get your jam (or whatever you are making) from the pot to the jar.
- A digital or analog scale – Some recipes call for ingredients in weight measurements, but not all. I have an extremely basic analog scale and to be honest it totally does the trick.
- Potato masher – This was a necessary tool in order to turn my cooked strawberries into yummy, mushy jam.
The “nice to have” tools...
- Basic thermometer – To test the temperature of the water before sterilizing jars/lids.
- Canning rack – This is to lower the jars into and out of the boiling water when you are processing them and to provide space between the bottom of the jars and the pot (you can use other things like jar bands, silverware or even a dish towel to create that space). I don’t personally have one and I survived, but I can see the value if you are going to be doing a lot of canning. Just make sure the size you buy fits your pot if you aren’t getting a set!
- Dissolvable labels – I seriously love these things, but if you can’t justify the expense some regular old masking tape will definitely get the job done.
- Pressure canner – As I mentioned above I don’t see myself “pressure canning” anytime soon, but if you want to preserve low-acid veggies then this is a necessary piece of equipment.
- Immersion blender - you could use this as an alternative to the potato masher, to blend up the ingredients
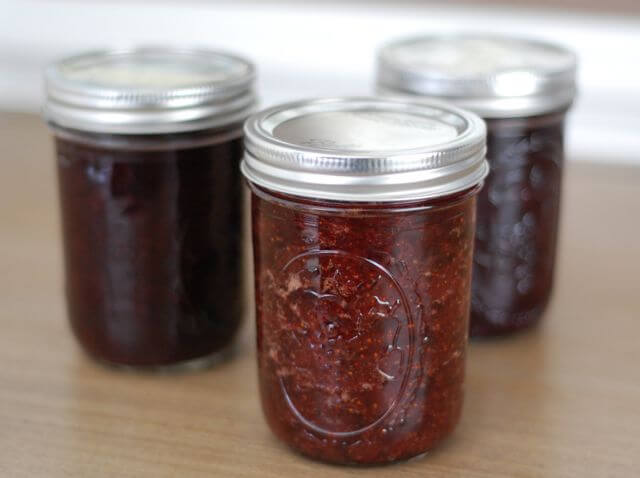
6 Easy Steps to Can Strawberry Jam Recipe Without Sugar and Pectin
- Follow homemade jam recipe (as stated below).
- While it’s cooking sterilize the jars and lids/bands in hot water.
- Ladle the completed jam into hot, freshly sterilized jars one-by-one.
- Add jar lid to the top while keeping the inside sterilized.
- Screw on the bands and add jars to boiling water for 10 minutes.
- Remove jars and listen for the “pop” sound to ensure jar lids have been properly sealed. It’s that simple! :)
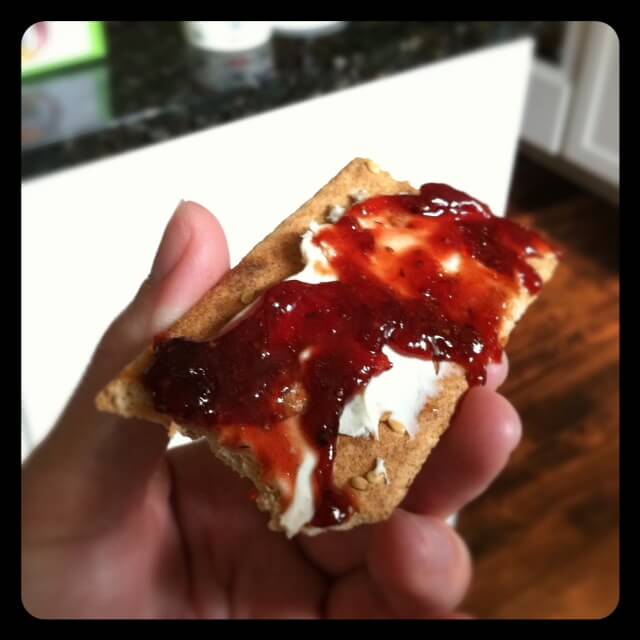

Strawberry Honey Jam
Ingredients
- 6 pounds strawberries (or blueberries or other ripe fruit)
- 3 ¾ cup honey
- 1 ½ apples (unpeeled and grated)
- 1 ½ tablespoons lemon juice (freshly squeezed)
Instructions
- Make JamRinse the berries and remove any spoiled or severely blemished ones. Hull strawberries and slice in half.
- Add the berries, honey, grated apple, and lemon juice to a large pot over high heat. Once the mixture comes to a rolling boil, lower to medium heat and allow the mixture to continue to boil lightly for approximately 30 - 60 minutes. The berries will burst and thicken so be sure to scrape the sides of the pot and stir as you go. The longer the jam cooks the thicker the final product will be, although this recipe does not become quite as thick as typical store-bought jam (see note below about adding arrowroot powder or chia seeds for thickening)

- Mash the fruit with a potato masher once the fruit begins to soften. If foam forms on top of the fruit you can skim with a metal spoon and discard if desired.
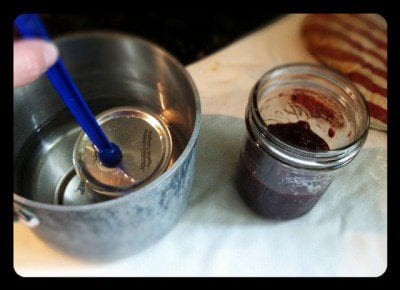
- Prepare Sterile Jars: Meanwhile fill the canning pot ¾ full with water, cover, and bring to a boil over high heat. If you don't have your jars sterilizing in a hot dishwasher you can use this pot of water to sterilize them. Also start a small pot of boiling water to sterilize the lids separately. Be sure to wash all jar pieces in hot soapy water first.
- Once the water is boiling turn off the heat. Test the temperature with your thermometer and when it reaches 180 degrees F put the jars and bands in the large pot and the lids in the small pot. Leave everything in the hot water until ready for use, removing one at a time as needed.
- When the jam is done cooking do a taste test to make sure the thickness and flavor is to your liking. Hint from Ashley: Drop dots of jam on a cold plate, if it seems to set up, it is done. You can also see if it coats the back of a spoon.
- Remove the first jar from the hot water using your jar lifter tool and shake out excess water. Don't touch inside of the jar in order to keep it sterilized. Insert clean canning funnel and ladle the hot jam into the hot jar leaving ¼ inch headspace at the top (this is where the headspace tool can come in handy - leaving more space at the top might not give as good of a seal). If there are any air bubbles you can slide a clean knife along the inside of the jar to remove them. Using a clean rag wipe excess off the outside of the jar and rim.

- Using a magnetic lid lifter pull the first lid out of the hot water and set on top of the jar without touching the bottom of it. Then while only touching the outside of the band screw it onto the jar just firmly enough so it doesn't feel wobbly on the grooves. Repeat until all jars are filled.

- Note (If you don’t want to actually “can” the jam): You could stop here and refrigerate jam for 3 – 4 weeks. To freeze the jam make sure you used freezer-safe jars, (Ball makes plastic jars for this purpose), leave at least a half an inch of space for expansion, allow the jam to completely cool, and put in freezer for up to one year. One additional tip for freezer jam is by placing a round of parchment paper on top of the jam, you can prevent ice crystals from forming.
- Process the Jars:Bring large pot of water back to a boil. Using your jar lifter (or canning rack) carefully lower as many jars that will fit without overcrowding into the boiling water so they are covered by at least 1 - 2 inches of water. It is recommended that the jars do not directly touch the bottom of the pot (so hot water can flow beneath them) and some even suggest putting a dish towel on the bottom to create space. From the moment the water is boiling and the entire first batch of jars are submerged set the timer and process them for 10 minutes.

- When 10 minutes is over use the jar lifter to carefully remove the jars from the water. Put them on the counter and don't move them right away. You will hear your jar lids "popping" which means they have been sealed properly. If jars aren't sealed within 12 hours then move them to the fridge and eat within 3 - 4 weeks.
- Remove bands from sealed jars and with a clean, wet cloth wipe off any jam that has congealed on the outside rim of the jar. This prevents mold from forming on the band. The band can be reapplied, but don’t screw them on too tightly.
- Label jar and store in a cool, dry, dark place for up to 1 year.


Notes
- You can optionally add in arrowroot powder or chia seeds as a way to thicken the jam. If you like jams with crunch, opt for the chia seed addition!
- We recommend organic ingredients when feasible.


Sharon T says
If you don't know whether a home canned item is safe or not, DO NOT just take a little taste to check!!! Botulism is a danger of improperly canned foods. If you follow the canning instructions of a current canning book (like Ball or Kerr) you should be just fine.
andria says
forgot to mention sweetened some with stevia and some with honey. Stevia did just fine for me.
andria says
I did use the concord grapes and it came out great! I boiled the grapes over low heat till they were very soft. The ran them through a sieve to grind up the skin and remove the seeds. Then slow boiled them down again till I had the desired thickness I wanted. At that point I sweetened the jam and made different flavors by adding lemon and cinnamon or almond or clove and simmer for last 20mins. Then filled my jars and processed them. Flavor is great and so is the thickness and it thickens even more after it is opened and stored in the fridge. Thanks for the inspiration.
Catina says
All my Jam is coming out runny.
I followed the recipe.
I have to ask the recipe say 3 3/4 cups of honey.
Is this 3/4 cup or 3 and 3/4 cups?
Assistant to 100 Days (Jill) says
Hi Catina. 3 cups plus 3/4 cup. Hope that helps. Jill
april says
I am going to be making a lot of peach jam and i don't want to use sugar or pectin. Do you know if I use the same recipe for Peach jam? I don't want to screw this up, I am doing about 100 pounds worth! Any help would be greatly appreciated. Thank you.
Stephanie Ives says
The reason this recipe works is that apples naturally have pectin in them.
Assistant to 100 Days (Jill) says
Hi April. The natural pectin in the peach is just different...I have heard some having success and some who have not. I'd hate for it to not turn out for you using so many ingredients. Jill
Marie says
I was looking to do some peach jam too. Did this recipe work with peaches? I have made the strawberry jam using this recipe and it was amazing! I'm hoping the peaches turn out the same way. Thanks.
Assistant to 100 Days (Jill) says
Hi Marie. Some readers have commented that they tried it with peaches and it worked out ok. I have not done it though. Hope it works out well for you if you decide to give it a try. Jill
Melissa says
Make sure you're adding some lemon juice to peaches otherwise you'll have to pressure can them as peaches don't have the required acidity for water bath canning. You can also make your own natural pectic for low pectin fruits, http://www.motherearthnews.com/real-food/pectin-recipe-zmaz80mjzraw.aspx#axzz2PcZR7slT.
Ashley says
Thanks for the link!
andria says
can you use concord grapes for your method. thanks
Assistant to 100 Days (Jill) says
Hi Andria. I've not tried it. My only concern is that the grapes wouldn't have enough natural pectin. Let us know how it goes if you decide to give it a go. Jill
Verna says
I made muscadine jam (southern version of the concord) with out pectin. It worked great.
andria says
can you use grapes to make jelly with your method?
Angie says
I don't have a scale for weighing my berries. I'm wondering if anyone knows how many cups equals 6 lbs of berries.....
Thanks!
Wendy says
Hi. My first attempt at jam many years ago in Australia, was peach jam. I was telling an older woman in the community how well it turned out and she was most surprised as she said how difficult it was to make set. The difference in my case was that my recipe was for peach and passionfruit jam. I think she figured out that it must have been the higher acid content of the passionfruit that made the difference. If you are not able to buy it in the US perhaps it may be available in cans in the supermarket, but it is processed with sugar. Otherwise, continue to research and adapt to sugar free. Perhaps increasing the lemon juice may do the trick :)
Gg says
Hi
I m a little confused with the NOTE. If I do not want to can my strawberry jam, is it ok to just sterilise the old lid instead of buying new lid?
I collected different shape of bottles and it is kinda difficult to buy different shape of lid in this case
Mary Jane Smith says
I was given about a peck of green grapes with seeds. I made a triple batch(12 cups of juice and pulp, 21 cups sugar, 3pks liquid pectin) of jam using pectin 2 days ago. It yielded 23 cups of jam. It is still gelling. The flavor is mild grape and very sweet.
The next night, I made a quadruple batch (16 cups of juice and pulp, 16 cups sugar) last night without pectin. It cooked for 1 hour and twenty before showing signs of gelling. It yielded 14 cups of jam. It turned out to be very sticky.
The reason I tried jam without pectin was to:
a)reduce the cost of sugar, pectin and jars,
b)reduce the amount of sugar in the final product
c)achieve a more concentrated grape flavor.
Green grapes have a milder flavor than Concord grapes. I don't need a high yield because I make many varieties of jam and preserves. I was disappointed with the sticky texture.
Several years ago, I made plum jam without pectin and it was also sticky. I gave some to my sister. She said it came out of the jar all in one clump. I gave some to a friend and she put it in the microwave to "soften". It became as hard as Jolly Ranchers!
TODAY, after all this, I found this website which answers a lot of our questions.
http://extension.missouri.edu/p/GH1461
I'm saving it for future reference.
I also did a search on "gel point" and found some great information on that, including altitude information. I have obviously have over cooking my jams!
Sometime I use the "upside down jar" method of sealing rather than a water bath. I don't think it is recommended any more by manufacturers, home economists, cookbooks etc., due "an abundance of caution" over food safety. It is safer than the wax sealing method, which also is no longer recommended.
Some sealing methods are suitable for only some types of foods. So I think they have discontinued the recommendation of the methods which have a lower threshold to avoid deadly confusion.
If you suspect something is bad, DON'T TASTE IT! Botulism, you know.
I used to use a cone shaped food mill with a wooden pestle to separate seeds and peals from the juice and pulp. But this year I bought the OXO Good Grips food mill (model 1071478) from Bed Bath and Beyond. It cost about $50. I love it! It is so easy to use. See website oxo.com.
Happy Jamm'in!
1st time jammer says
I recently made jam for the first time with a friend using the sugar and pectin, it was very simple to make and tasted great but I was shocked at the amount of refined sugar and pectin it took to make it. When she invited me to make jam, I was so excited about learning how to do something so "wholesome and natural"...boy was I wrong! I immediately came home and began research on making all natural, organic jam. Thank you for sharing this recipe, I look forward to making it!!!
Megan says
I did this with a friend about a week ago and it turned out great! It was my first time canning and a really good experience. The only thing we did differently was we blended the blueberries in my blender after they cooked for a while because we couldn't get them mashed up enough with my potato masher. Doing it that way helped the second batch we did thicken much quicker. I'm looking forward to trying it with strawberries next year! Thanks for all the recipes!
Debbie says
Thank you for teaching me how to make jam without sugar.
Heidi says
Has anyone had success making this jam with peaches? I have a bunch to use up, and was hoping I could use this recipe, but it seems from the comments that others have had difficulties using peaches.
bk says
This is the newest canning blog I have found and here goes...I make jam with splenda and dehydrator so I don't overheat the house for hours. (also have cooked down in a crockpot with the lid off. Then I water bath the filled jars of jam (thicken fruit) for l0 to 15 minutes. Always turns out perfect.
Diana Harris says
I halfed the recipe and made my first batch of strawberry jam ever yesterday. Holy cow it was great. My husband said "i'll never be able to eat the stuff in the stores again". I let my berries cook about 1 hr and 15 min (mainly because I was doing other things in the kitchen and lost track of time) and it worked out great!!! Thanks for the recipe.
Julie says
Im attempting peach jam tomorrow. Very nervous about not using pectin now that I've read Michelle's post. I do know that you need to work with small batches for peaches.
Michelle Kukshtel says
Epic fail on making peach jam yesterday! I tried to double your recipe using peaches and the jam would not set. Has anyone tried the recipe with peaches successfully? I am going to try again today. I have read several other sites on the Internet and all have said to NOT double the recipe. Wish I had researched this at the beginning! With peaches, do you still use 6 lbs or do you use less? I am determined to get this right! I want to make with honey and the apple since I am trying to avoid using pectin and refined sugar in the recipe!
Assistant to 100 Days (Jill) says
Hi Michelle. Sorry it did not work out. I saw another reader tried doing peaches as well and it didn't seem to work (I thought I had read somewhere that peaches might be lower in pectin). I did also read that making jams in small batches is better, so, doubling may have also been a problem like you said. I hope it works out next time around. Jill
Michelle says
After reading other sites, DO NOT double the recipe! I attempted peach jam again and was only successful getting it to thicken after I added pectin. Was bummed about having to add it, but I did not want to waste another batch. It is yummy. I am determined to try again! Any ideas about a "real food" substitution for the pectin when making peach jam? The apples don't seeme to work.
Nikki says
If you need to use pectin, Pomona works great! It's preservative free and requires no sugar. I LOVE this for fruits low in pectin and in need of a boost. http://www.pomonapectin.com/index.html
Janey says
I cut this recipe down and made 1/3 of it while doing some other kitchen duties. I was so surprised how easy this was. I intend to make the whole wheat pop tarts for my almost 3 year old grandson Joel. His other Grandma has lots of processed treats at her house including pop tarts. He usually is content with fresh fruit, etc when he is here, but occasionally will ask for a pop tart. Will be nice to surprise him!
Sarah says
I live in New York and I used 7.5 pints of farm-fresh blueberries (based on the weight measurement of one pint) and I got thirteen - 8oz jars of jam! I processed seven - HORRAY they all sealed - and made the last 6 into freezer jam. The berries ended up cooking between 45-60 minutes at a slow boil before it was thick enough to put into the jars. I did not want runny jam! I was so excited after it was done I put some warm jam on my ice cream... mmmmm!!! Thanks for the recipe!
Katie says
I made the strawberry version and then I did it with apricots. They both turned out great!
Thank you for sharing. I love jam and it was my last un-real-food item that I just couldn't get rid of! Now I can enjoy my jam treat with less guilt! Oh, and canning is not hard after all :).
Tara Foreman says
I was talking to my mother last night and we always used Gulf wax (paraffin wax). we used this for sealing instead of boiling it again. Is this a bad thing?? also to get the foam off, my great grandmother would get wax paper and cover the top of the fruit. She would do this twice with new wax paper and the foam comes off the top of your fruit easier than spooning it off. I can't wait to try this recipe!!!!
Lisa says
Good to know about the wax paper...and since I am new to canning I am not sure about the paraffin wax, but I do see it for sale with the canning supplies so I know some people still do it this way.
jojo says
You aren't suppose to use wax anymore. It was just a way to help preserve the jam if the glass lids they used didn't seal properly. Glass lids should not be used because there is a higher chance of bacteria contamination with them.
Besides that the wax gets ucky from the jam when you open it and you can get wax right in your jam
Kim@hungryhealthygirl says
I have tons of fresh peaches and have thought about making some jam with them. Maybe I will now. Thanks so much for the post!!
Anon says
Can you use other sweeteners as a substitute for honey? I am thinking maple or agave syrup.
Lisa says
Anon - That may work if you want to freeze the recipe, but I'd be careful making substitutes for canning.
Sloan says
Ok, sorry for flooding your feed, but today I did blueberries and they only took 40 minutes to cook and set. I guess the time greatly varies depending on the type of fruit. I can't wait to try it! Thanks again!
Sloan says
I successfully made this last night using strawberries! It was my very first canning experience. I did, like others, have to extend the cooking time to 1 hour and 45 minutes. I checked the jam every 30 mins using a cold plate and it eventually "set". Not sure if altitude plays a part in the jam setting up, but I'm in Denver, so maybe that had something to do with needing a longer cooking time? I used the dishwasher to keep my jars warm and all of my jars sealed perfectly. I ended up using granny smith apples. Thanks for the recipe! I'm making blueberry jam tonight. I hope to eventually move on to pressure canning... once I feel really comfortable with "regular" canning.
Sloan says
Does the type of apple used make a difference?
Lisa says
An apple on the more tart side (like Granny Smith) would be best, but any should work.
Crystal says
One more question - I've found a recipe that uses fruit juice to sweeten - would that be better nutrition wise than using honey, or is honey better? It uses 3 cups of juice for 8 cups of fruit.
Assistant to 100 Days (Jill) says
Hi Crystal. I still think the honey would be a better, less processed ingredient. I guess it would also depend on the fruit juice you are using in terms of the ingredients. Jill
Crystal says
What I wonder is how much of the nutrients leave from the cooking - is there a way to do a no-cook jam to preserve the nutrients?
Assistant to 100 Days (Jill) says
Hi Crystal. I don't have a recipe for that. I'm not sure how you would get it to thicken without cooking it. Let us know if you come across something. Jill
Annemarie says
I made this recipe a few weeks ago, and it's good but a bit too sweet for my taste. I made a similar jam with raspberries that came out delicious: http://realfoodrealdeals.com/2012/07/01/raspberry-jam-without-pectin/. Thanks for the inspiration!
Jadah Sellner says
Just stumbled upon this recipe. So happy to see it without highly processed sugar. My friend made some easy jam, but with pectin. She linked back to your blog, and I know she will try your recipe next time! http://familysponge.com/food/yummy-treats/super-easy-strawberry-jam/
Heather says
I LOVE this recipe. Thank you for sharing. I wanted to make a jam that wasn’t loaded with white sugar, and didn’t use pectin (I think that solid mass of jam that you sometimes get from a friend/relative is not only too sugary, but it also just looks disgusting ïŒ ) and this recipe is exactly what I was looking for. I love the floral tones that the honey gives you. I wanted to make jam for some of my Christmas gifts, one person being a vegan, so I also made two other variations and they turned out beautiful and tasty. I made a Strawberry Maple Jam, and a Strawberry Vanilla (using agave). Thank you again!
Amanda Morris says
I have now made this recipe twice. The first time with strawberries and white peaches. I cut the recipe down to 1/3, so 2 pounds of fruit and 1 cup of honey. The second time I made just strawberry and also a batch of blueberry. They both turned out great, blueberry being my favor so far. I cooked the berries for about 45 minutes to an hour and than used my immersion or stick blender to finish breaking up the big pieces of fruit and the consistency was perfect. We end up with some smaller chunks of fruit, but nothing my kids won't eat. I also used the jam to make some 'real' cereal bars for my kids breakfast or to snack on. Thanks for the great recipe, I will be making more batches as we keep getting fresh fruit in at the farmers market!
Jessica says
Oooh! Can I have the recipe for the cereal bars? My son loves the ones from Trader Joe's and I would love to be able to make them myself!
Mieke says
Can you recommend a good grape jelly recipe that does not use pectin or refined sugars? My husband prefers grape to strawberry and I'd like to try making it :) Thanks!
100 Days of Real Food says
I have not come across one yet myself...but I just ordered several canning books hoping to find some good recipes!
Becky says
I made this jam last night, and found it did not jell quite well enough. Finished product, although tasty, is still runny. That being said, I will still eat the jam, use it in cottage cheese, on crepes, in shakes, in home made Popsicles etc.
Like another reader said in a comment, I also did not process the jars after like the recipe said, and my jars all sealed/popped within minutes of closing them. I sterilized the jars in my dishwasher, timing it so the jam would be done when the dishwasher cycle was complete, and boiled the lids. I also ensured there was no jam on the rim of the jar before placing the boiled lid on. I got a perfect seal on every jar. Thanks for the great recipe, I would try again, maybe with different apples???
Assistant to 100 Days (Jill) says
Hi Becky. This jam isn't quite as thick as the store bought jam, but, it should "set" before it's done. Jill
Amanda says
Hi Lisa,
I tried this recipe last night and liked it! Similar to a few other posters, I cooked my jam for 2 hours to get to the desired consistency and only ended up with 4 pints. The honey flavor is very concentrated so in today's batch I'm going to add another quart of strawberries and try cooking 1 hour or maybe a little over. I too am new to canning and didn't find it too daunting. The worse part was cutting all of the tops off the strawberries!
Do you have a recipe source for canning? I'm thinking ahead and would like to find a "no refined sugar" recipe for blueberry pie filling once blueberries are in season in NH. I'm planning on trying this jam recipe for blueberries as well however we love blueberry pie and there is no hulling involved!
Keep up the great work.
Amanda
100 Days of Real Food says
Hi there and I am glad you liked the jam. Yes, the outcome is not quite as thick as store-bought jam, but you can certainly keep cooking it to your desired consistency. I've ordered a couple books like this one http://www.amazon.com/Canning-New-Generation-Flavors-Modern/dp/1584798645/ref=sr_1_4?ie=UTF8&qid=1341417130&sr=8-4&keywords=canning in hopes of finding more recipes without sugar, but I haven't had a chance to make anything yet. I will certainly share when I do find something good!
AmyE says
Hi Lisa! I was thinking of ordering this book and was curious if you've had a chance to look at it yet. If you have, what do you think? Or any other canning books you've found that you like? Thanks so much!
Lisa says
I have that book as well (Canning for New Generation) and it honestly calls for refined sugar in a lot more recipes than I'd like, but I still think someone could learn a lot from it.
Janiene says
Hi!! Thank you so much for this recipe. I have a difficult time processing sugar and have been looking for a jam recipe with honey. I am going to try my hand at this recipe this weekend. I featured you on my blog today:
http://bishopsfamilysite.blogspot.com/2012/06/inspiration-for-weekend-5.html
I will let you know how it turns out!
Blessings,
Janiene
Dianna says
Happiness is the pop of jars sealing!
Look forward to trying some jam without refined sugar, thanks for all the great info!
Vonda says
Can you tell me if you can go the same route canning sand plum jam or jelly? We have loads of wild sand plums all over this year in OK and I want to find a good way to can without sugar.
100 Days of Real Food says
I wish I could help, but I am new to canning so I wouldn't want to give you the wrong info!
Heather says
Yes, you are able to can plums the same way. You will need some form of "sugar" to preserve them, so you will have to use honey, agave, maple syrup, ect...