Want to Save this Recipe?
Enter your email below & we'll send it straight to your inbox. Plus you'll get great new recipes from us every week!
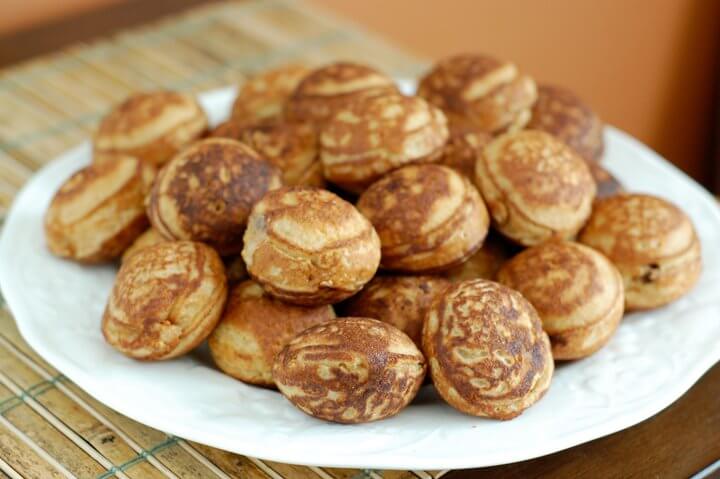
I recently saw a recipe for Ebelskivers in Parade Magazine that called for an unbelievable amount of sugar followed by even more sugar to be sprinkled on top of the finished product. Sure, these donut-like, filled Danish fritters might remind you of dessert, but they by no means need all that sugar (and white flour) to turn out delicious!

I have to credit my dad for introducing us to these “round pancakes,” as we like to call them in our family. He started making them for all the grandkids a few years back, and my daughters liked them so much they bought me a pan so I could make them at home.
Which brings me to a valid point…you do need a special pan (pictured) to make these! And I even share the technique for making them in the short video below (you'll have to x out the ad to see the subtitles). They are really fun to cook and, especially if you are new to the concept, they can make for a pretty special breakfast. Plus since round pancakes kind of remind me of donuts, I’m a fan. :)
Before we dive right into the video though I'd like to introduce one of our newest sponsors....The Pursuit of Healthiness! This Facebook page chronicles a busy girl's life as she attempts to become healthy and fit while working full time. Her page almost resembles a support group of sorts so go "like" her on Facebook in order to follow along as she makes the transition to real food.

Filled Pancakes (a.k.a. Whole-Wheat Ebelskivers)
Ingredients
- 2 cups whole-wheat flour
- 1 teaspoon baking powder
- ½ teaspoon salt
- 2 cups milk (preferably whole)
- 4 eggs
- 4 tablespoons butter (melted + extra for cooking)
- 1 tablespoon honey
- pure maple syrup (warmed (for serving))
Filling Options
- bananas
- pears
- peaches
- blueberries
- pecans
- jam
Instructions
- In a large bowl whisk together the flour, baking powder and salt, set aside.
- Separate the egg yolks from the eggs whites. This can be done by cracking the shells in half and moving the yolk back and forth between the two halves while the whites drip into a bowl.
- In a small bowl combine the milk, egg yolks, melted butter, and honey and whisk together thoroughly. Add the milk mixture to the flour mixture and whisk until combined, but still lumpy.
- Using an electric mixer whisk the egg whites until white and fluffy and soft peaks form. Using a rubber spatula carefully fold the egg whites into the pancake batter.
- Finely dice fruit and/or nuts to use as pancake filling, set aside.
- Warm up the pan over medium heat. Cut the butter into small bits about the size of a pencil eraser. Once pan is warm add a tiny pat of butter to each well in the pan.
- Next, using two spoons, fill each well about halfway with batter. Working quickly add about a teaspoon of filling (to each well) on top of the batter in the pan. Then quickly top with more pancake batter until filled to the top.
- Once the bottoms start to brown use the skewers to turn pancakes halfway. As soon as you are finished turning them halfway start working to turn them over the rest of the way until the other side browns.
- Once the batch is done use a spoon to remove pancakes from pan. Keep pancakes warm and repeat with rest of batter.
Serve with warm syrup and fresh fruit if desired.


Rosaria Wiseman says
Don't know what I did wrong....stuck to the pan. Any ideas?
100 Days Admin says
What type of pan are you using - non-stick or cast iron? If it is cast iron, make sure it's well seasoned and you add the pat of butter to help from sticking. If your heat is too high, that could also be an issue. - Nicole
Rosaria Wiseman says
It is a brand new cast iron skillet. I figured it out. Had to use coconut oil to get it greased enough and had to make sure that it was really hot before I began. I turned the heat down and they finally turned out great after my third attempt of working with a cast iron skillet. Kids loved them. Thanks for the recipe. Maybe next time the kids will leave me with one.
100 Days Admin says
Glad you figured it out! And yes, I hope they save you one, too :) - Nicole
Afsoon says
Just made this for breakfast this morning and everyone liked it. Thank you so much!
Nancy Dulin says
I have a Scandinavian heritage and grew up eating ebelskivers often, especially with sleepovers when my dad would treat us all to them. I can’t wait to try this healthier recipe. Thanks so much!
Sarah Smith says
Ebelskivers are also great prepared with gluten free flour!
D. says
What if you used a muffin pan and baked them, would that work?
Anne says
If you want to make a savory seafood version of filled pancakes, try Japanese takoyaki! Delicious!
Catia torrent says
We love making ebelskivers!!
Meg says
Can you use a cupcake tin for this instead of the Ebelskiver pan?
Amy Taylor (comment moderator) says
Hi there. Turning them would be the difficult issue. If you give it a go, let us know.