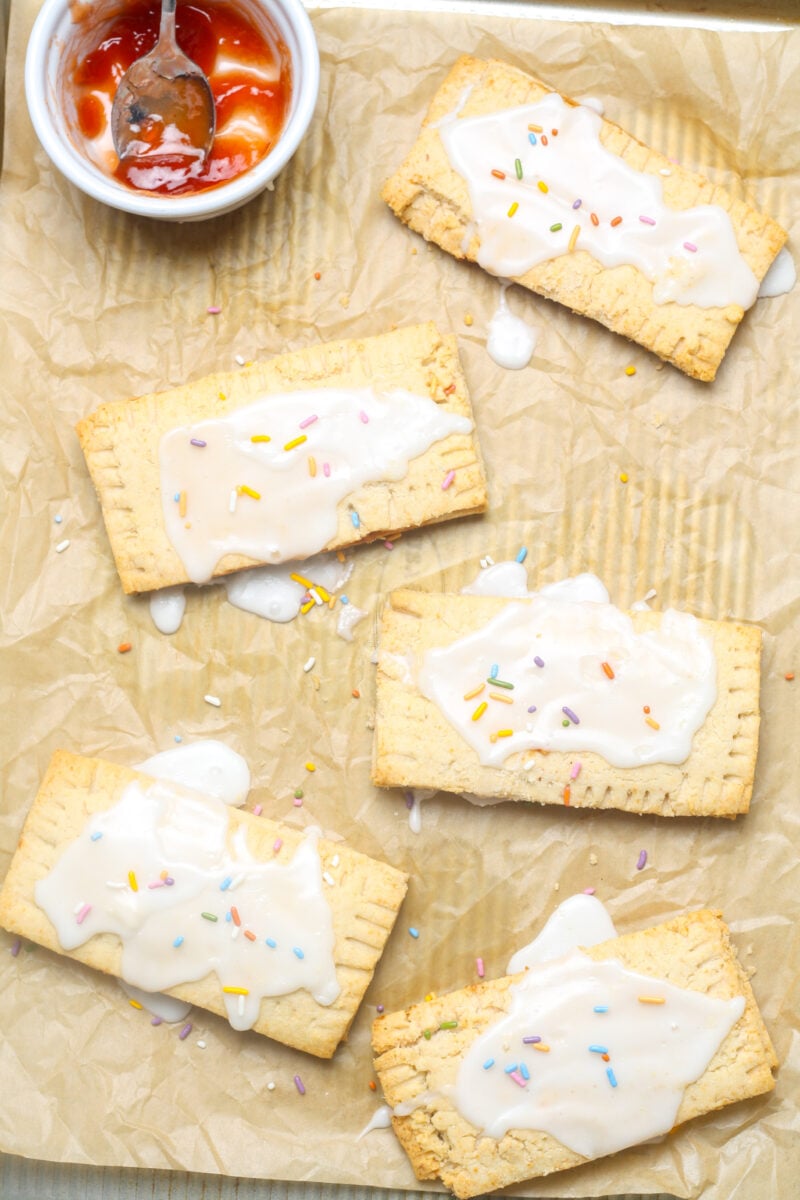
These gluten free Pop Tarts are a delightful treat that brings back memories of childhood! These tasty pastries are a classic breakfast option enjoyed by both kids and adults. Unfortunately, they often contain gluten and loads of sugar. This recipe provides a delicious and simple way to savor this classic delight without the gluten and with much less sugar!

Want to Save this Recipe?
Enter your email below & we'll send it straight to your inbox. Plus you'll get great new recipes from us every week!
Why You'll Love This Recipe
- These gluten-free Pop Tarts are a timeless favorite, featuring a buttery, flaky crust and a sweet, fruity filling.
- The dough is flaky and delicious, and the filling is perfectly sweet and tart.
- You can customize the recipe to your liking, using different types of filling.
- Their versatility allows you to customize them with your preferred jam or jelly.
- These Pop Tarts are just as good as the real thing, but they are gluten free and lower in sugar!
- These treats are loved by both kids and adults. So is this Gluten Free Monkey Bread!
- This recipe is gluten-free and, aside from the vanilla glaze, sugar-free.
- Check out these Homemade Snack Bars for another fun breakfast recipe!
Ingredients & Substitutes
These are the ingredients and substitutions for these gluten free pop tarts. Scroll down to the recipe card below for the entire recipe.
Paleo baking flour is a healthier option than white flour for this recipe. In addition, it is naturally gluten free.
Sea salt adds flavor to the pastry dough.
Cut the unsalted butter into cubes. Use cold butter straight from the fridge. Do not use melted butter. Use a food processor to make the dough. Do not mix by hand.
Cold water helps the dough bind together.
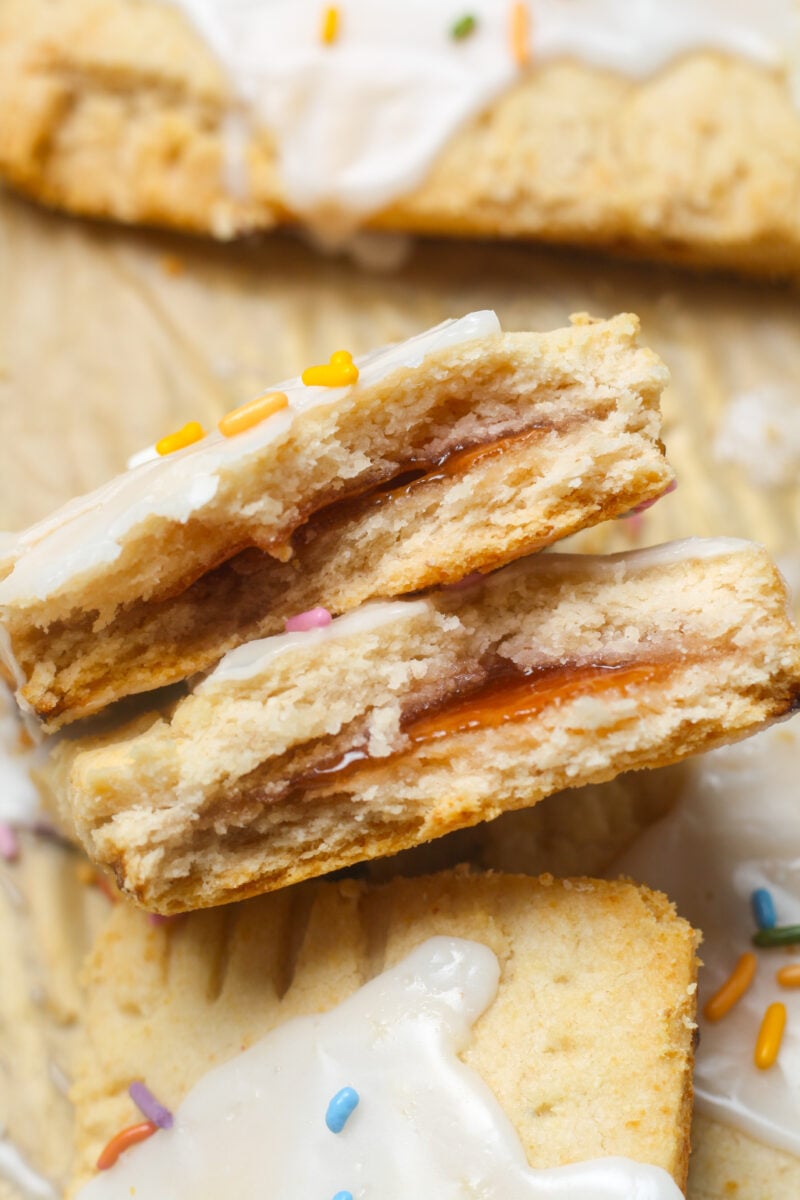
Fill the pop tarts with jam, jelly, or brown sugar.
Organic powdered sugar and milk create the vanilla glaze on top!
Taste & Texture
The crust of gluten-free Pop Tarts is flaky and buttery, just like the real thing.
The filling is sweet and tart. The glaze is rich and creamy.
The overall taste and texture of a gluten-free Pop Tart is very similar to a traditional Pop Tart.
How to Make
Step 1
First, make the dough. Add the Paleo flour, sea salt, and cubed butter to a food processor. Pulse until crumbly.


Step 2
Then, add in the cold water. Pulse until the dough sticks together.


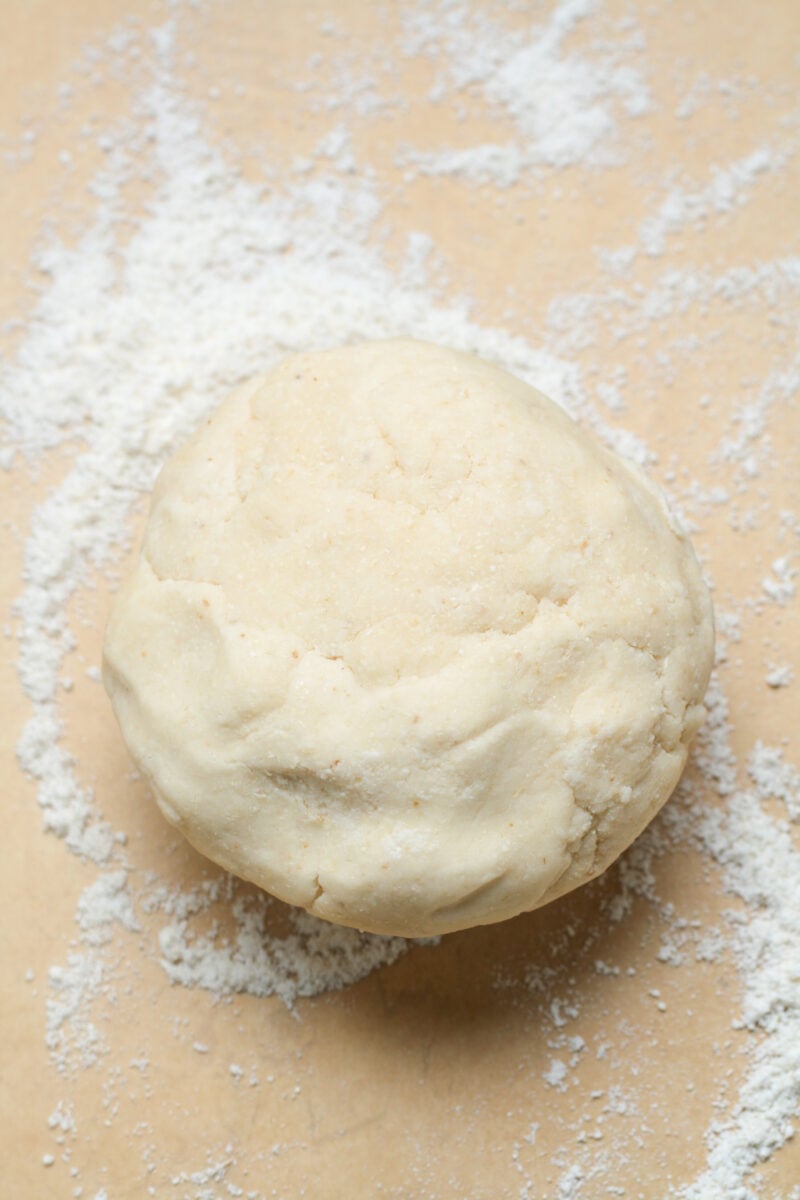
Step 3
Form the dough into two flat disks. Wrap with plastic wrap. Chill for 1 hour.

Step 4
After 1 hour, roll out the first disk on a lightly floured surface to ¼ inch thickness. Roll out to a 4-inch by 6-inch rectangle.

Step 5
Use a pizza cutter or sharp knife to cut into three rectangles, each 4 inches by 2 inches. Carefully transfer to a lined baking pan. Roll the excess dough back into another rectangle and cut out two more rectangles.
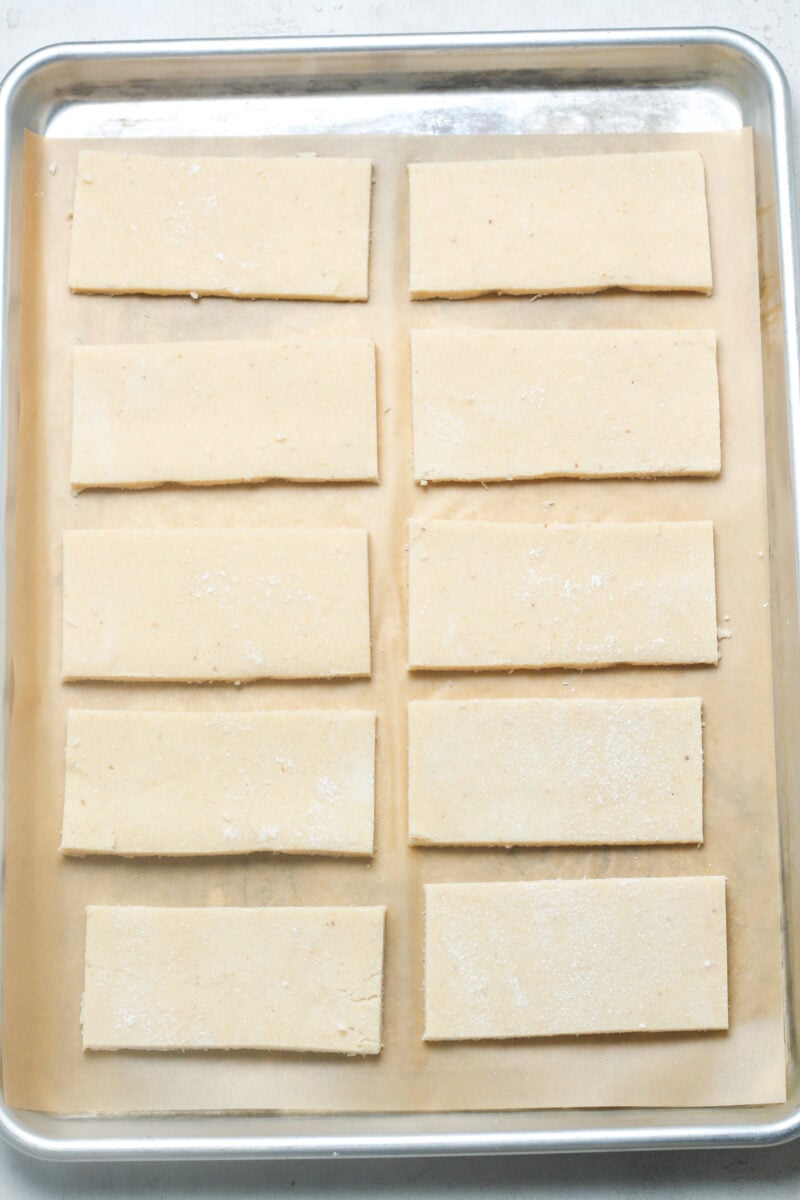
Step 6
Repeat this process with the other flat disk. You should have 12 rectangles on the lined pan by the end.
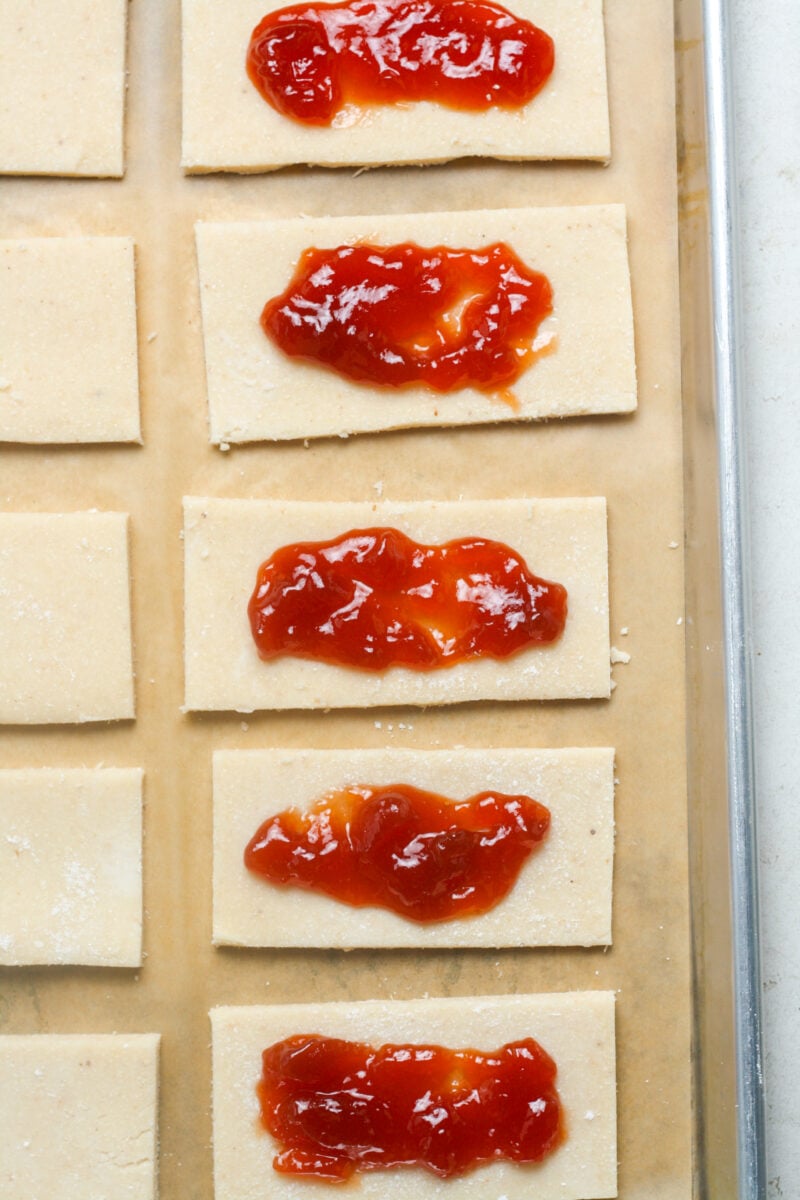
Step 7
Add the filling to half of the rectangles. Allow at least ½ inch of space around the edges of the dough without filling. Otherwise, the jelly will escape.
Step 8
Then, very carefully place the other half of the rectangles on top.

Step 9
Use a fork to crimp the edges. Gently pierce the top of each pop tart with a fork 3 to 4 times.
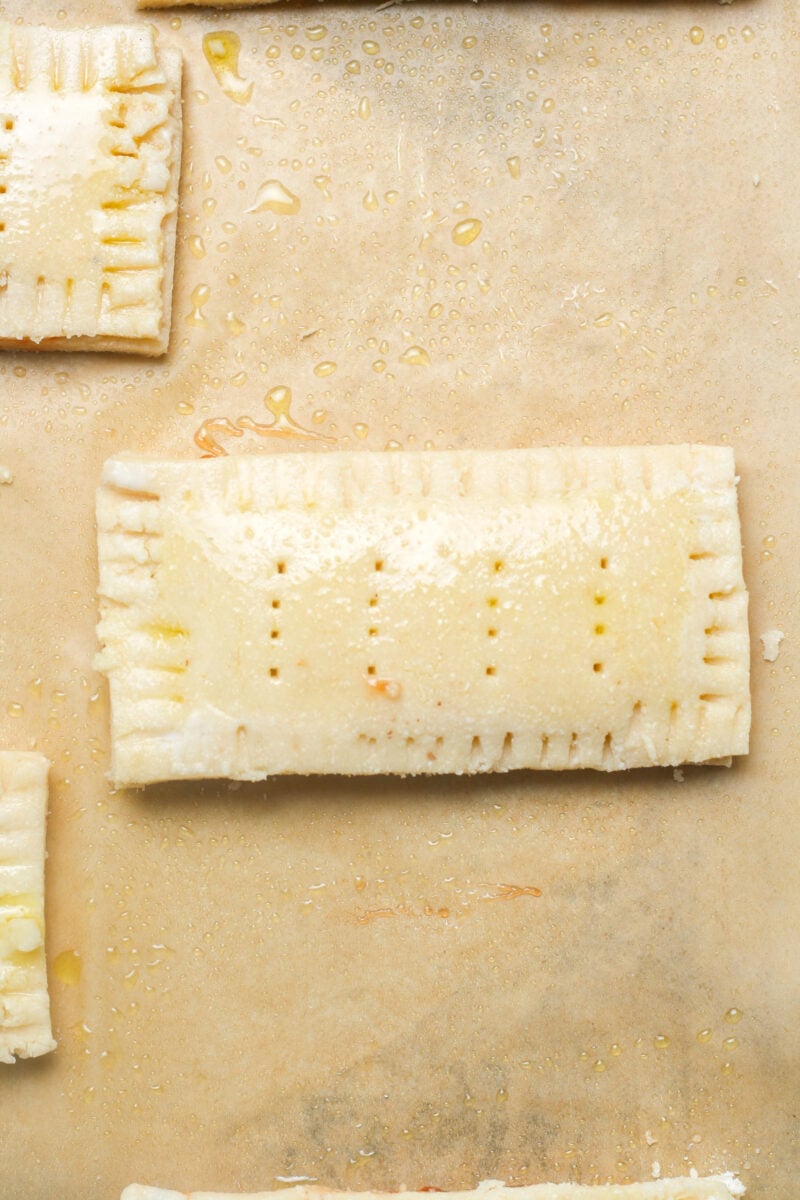
Step 10
Brush the edges with an egg wash or milk.
Step 11
Then, bake for 27 to 30 minutes at 375 degrees Fahrenheit.
Step 12
Finally, remove from the oven. When they are completely cool, make the glaze.
Step 13
In a small bowl, combine the powdered sugar and milk. Stir until creamy.
Step 14
Once the gluten free pop tarts are cool, add the glaze. Top with sprinkles if desired!
Expert Tips for Success
Here are a few expert tips and tricks for making the best gluten free Pop Tarts.
Use a food processor to make the dough. Do not mix by hand.
Chill the dough before rolling it out. This will make it easier to roll out.
Use a pizza cutter to cut out the Pop Tart rectangles. This will help to prevent the dough from tearing.
Seal the edges of the Pop Tarts well before baking. This will prevent the filling from leaking out.
Bake until they are lightly golden brown. This will help to ensure that the crust is flaky and that the filling is set.

Flavor Variations & Add-Ins
There are many different flavor variations and add-ins that you can use for these gluten-free Pop Tarts. Here are a few ideas.
Filling: You can use any type of filling that you like, such as fruit jam or peanut butter.
Frosting: You can use any type of frosting that you like, such as vanilla buttercream, chocolate frosting, or strawberry frosting.
Sprinkles: You can add sprinkles to the top of the Pop Tarts before baking for a fun and festive look.
Nuts: You can add nuts to the filling or glaze for a crunchy texture.
Chocolate chips: You can add chocolate chips to the filling or glaze for a chocolatey treat.
How to Serve & Store
Serve these gluten free pop tarts warm or cold.
Eat as a breakfast, snack, or dessert.
To store, place them in an airtight container at room temperature. They will stay fresh for up to 4 days.
Frequently Asked Questions (FAQs)
No, you cannot use regular flour in this recipe. Gluten-free flour blends are specially formulated to contain ingredients that give baked goods a similar texture and taste to regular baked goods. If you are not gluten free, then white whole wheat flour works in this recipe.
Yes, you can bake the Pop Tarts in a toaster oven. However, you will need to reduce the baking temperature and baking time slightly.
We do not recommend freezing the pop tarts if they have the glaze on top. Therefore, freeze them before adding the glaze. Then, thaw overnight at room temperature. Make the glaze before eating.
A food processor makes this recipe easy. However, if needed, add the pastry dough ingredients to a bowl. Use a pastry cutter, fork, or your fingers to incorporate the butter into the mixture.
Sure! Make the dough up to 48 hours in advance. Store in the fridge.
Equipment Needed
Food Processor: This food processor makes the best dough. It is powerful and easy to work with.
Baking Pan: These are my favorite baking pans.
Pizza Cutter: Use a pizza wheel to cut the dough. It makes super sharp and precise cuts.
Check out all of our Kitchen Favorites!
You May Also Enjoy
- Chocolate Chip Banana Bread
- Chocolate Chip Blondies
- Banana Nut Muffins
- Homemade Banana Pudding
- Gluten Free Brownies
If you enjoyed this gluten-free pop tart recipe, please leave a rating and comment! For more inspiration, check out my Facebook, Instagram, and Pinterest. For 5 free weekly meal plans and more free resources, sign up to receive my free newsletter! In addition, check out these Breakfast Recipes!

Gluten Free Pop Tarts
Ingredients
Dough
- 3 cups Paleo baking flour
- ½ teaspoon sea salt
- 1 cup cold unsalted butter (cut into cubes)
- ½ cup cold water
Filling
- ⅔ cup sugar free jelly (or jam)
Glaze
- ½ cup organic powdered sugar
- 1 tablespoon milk
Instructions
- First, make the pastry dough. Add the Paleo flour, sea salt, and cubed butter to a food processor. Pulse until the mixture is crumbly.
- Then, add in the water. Pulse until the dough sticks together.
- Form the dough into two flat disks. Wrap with plastic wrap. Refrigerate for 1 hour.
- After 1 hour, roll out the first disk on a lightly floured surface to ¼ inch thickness. Roll out to a 4 inch by 6 inch rectangle.
- Use a pizza cutter or sharp knife to cut into three rectangles, each approximately 4 inches by 2 inches. Carefully transfer to a lined baking pan. Roll the remaining dough back into another rectangle and cut out two more rectangles.
- Repeat this process with the other disk of dough. You should have 12 rectangles on the lined pan by the end. Make sure you have an even number of rectangles.
- Add the jelly filling to half of the rectangles. Allow at least ½ inch of space around the edges of the dough. Otherwise, the jelly will escape.
- Then, very carefully place the other half of the rectangles on top.
- Use a fork to crimp the edges. Gently pierce the top of each pop tart with a fork 3 to 4 times.
- Brush the edges with an egg wash or milk.
- Then, bake for 27 to 30 minutes at 375 degrees Fahrenheit.
- Finally, remove from the oven. When they are completely cool, make the vanilla glaze.
- In a small bowl, combine the organic powdered sugar and milk. Stir until creamy and smooth.
- Once the pop tarts are cool, add the vanilla glaze. Top with sprinkles if desired!
Notes
- We recommend using organic ingredients when possible.
- Paleo baking flour replaces white flour or whole wheat flour to make this recipe gluten free.
- If the dough tears, repair with your hands. It is a forgiving dough.
- The rectangles do not have to be perfect. Do the best you can!
- Leave about ½ inch of space around the edges of each rectangle without jelly.
- Bake until the edges are lightly golden brown.
- Allow the pop tarts to fully cool on the pan before transferring to a wire rack.
- Store in an airtight container for up to 4 days.
- We love these dye-free sprinkles.


Leave a Reply